
Want to connect AI to your daily apps, smart home tools, or simple web workflows without building a full backend? IFTTT is one of the easiest ways to do it.
It works especially well when you want to connect events from consumer apps or devices to web requests, then send the result somewhere useful. IFTTT supports Webhooks, queries, and filter code, which means you can trigger a workflow, call an external API, and shape the result before the final action runs.
Below, let’s walk through how to build an IFTTT setup that listens for an event, sends data to an AI API, handles the response, and pushes that output back into your workflow.
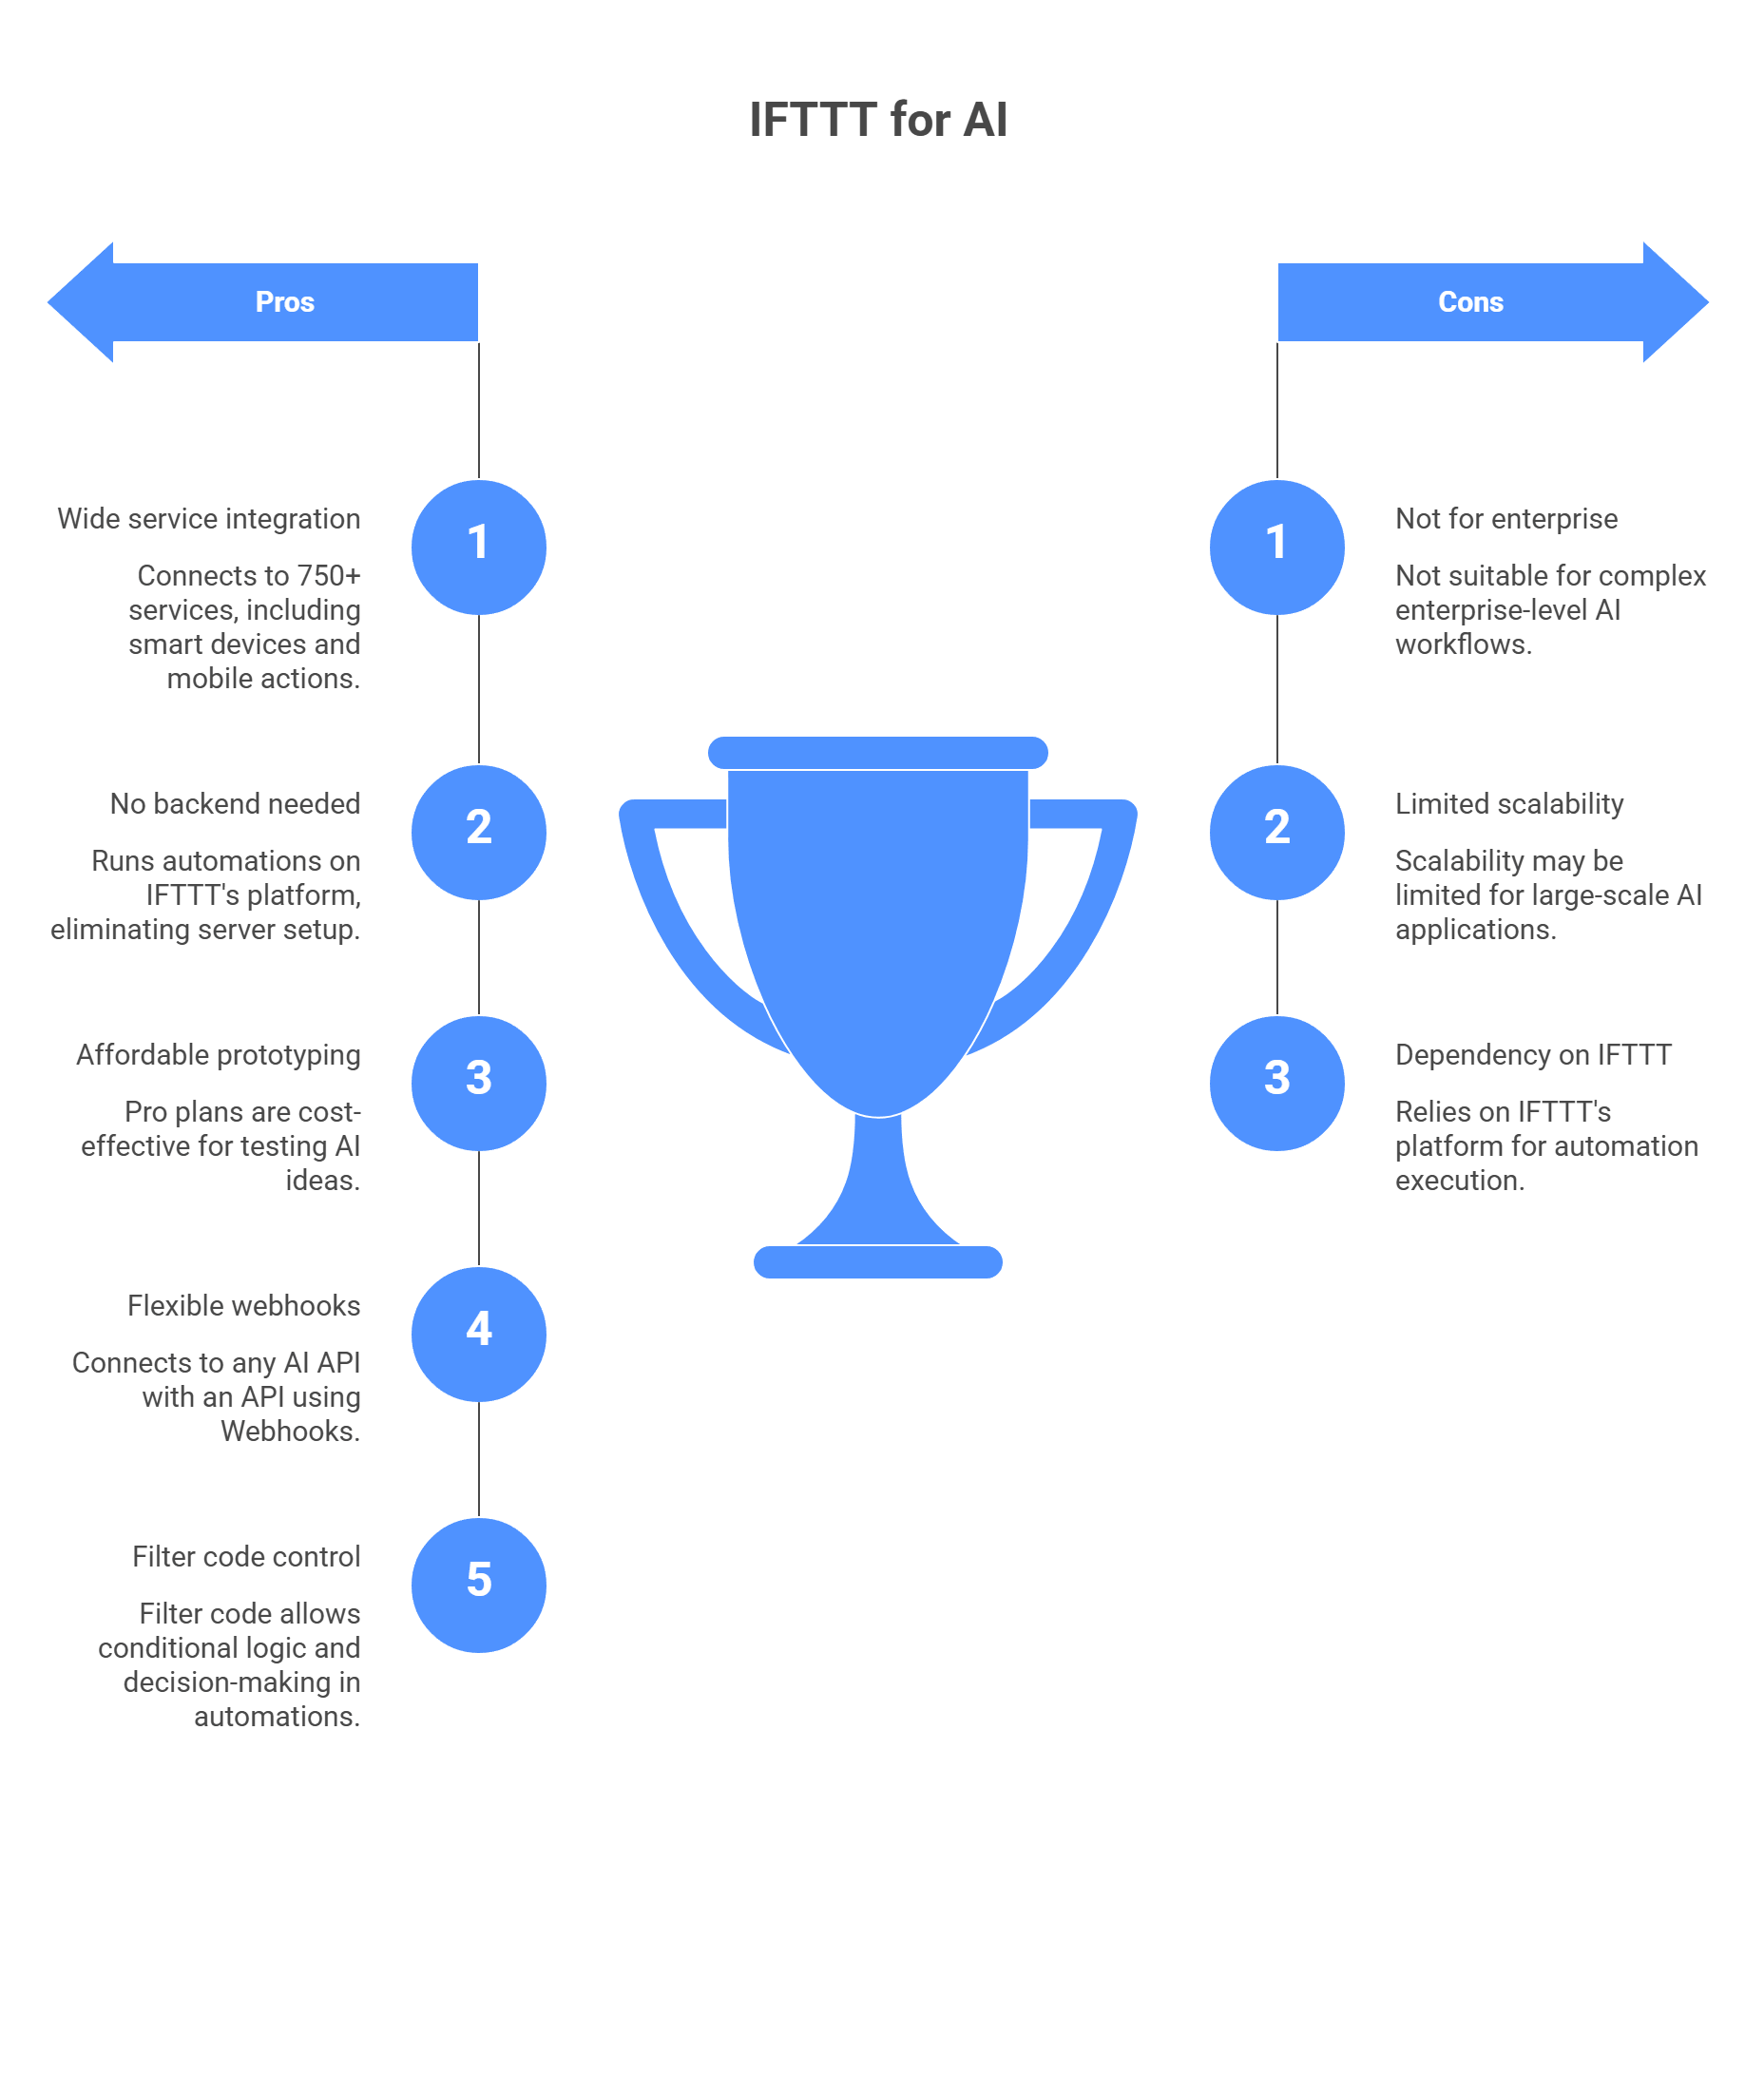
Why IFTTT is better for AI than people expect
A lot of people skip IFTTT when they think about AI workflows. That is a mistake. If your project touches smart devices, mobile actions, or lightweight personal automations, IFTTT can be a surprisingly good fit.
Why does it work so well here?
- It reaches apps and devices that business-first tools often do not focus on. IFTTT centers its platform around connecting apps and devices, and its Webhooks service is built to automate across 750+ services. That makes it useful when your workflow starts with a phone action, a smart-home event, or another consumer-style trigger.
- You do not need your own backend just to test an idea. IFTTT runs the automation flow in its own platform, so you are not setting up a server just to catch a trigger, send a request, and return a result. Its Webhooks service can send web requests, and its query tools can return response bodies for later steps in the Applet.
- It is pretty friendly for cheap prototyping. IFTTT’s plans are much lighter than enterprise automation tools. Its business-focused explainer lists Pro at $2.92/month and Pro+ at $12.50/month, while the plans page and help center confirm that advanced features like filter code and queries sit on Pro and Pro+ tiers.
- Webhooks make it more flexible than it looks. You are not stuck waiting for a native AI integration. If the AI provider has an API, IFTTT’s Webhooks tools can usually connect to it. The Webhooks FAQ says the service includes triggers and an action on Pro, plus three queries on Pro+, which is a big part of what makes custom AI flows possible.
- Filter code gives you more control than people expect. This is one of the most useful parts. IFTTT’s filter code runs right after a trigger fires and lets you skip actions, change field values, or add conditional logic. That means your AI automation does not have to be just “if this, then blindly do that.” It can actually make decisions first.
- It can work with JSON responses too. If your AI API returns JSON, IFTTT can handle that better than many people assume. Its help docs explicitly say you can parse a JSON body with filter code, and its Webhooks query docs say the JSON response body can be returned and parsed for later use.
So no, IFTTT is not the tool for every serious enterprise workflow. But if you want a fast, low-friction way to connect AI to phones, devices, simple app events, or personal automations, it is a lot more capable than people give it credit for.
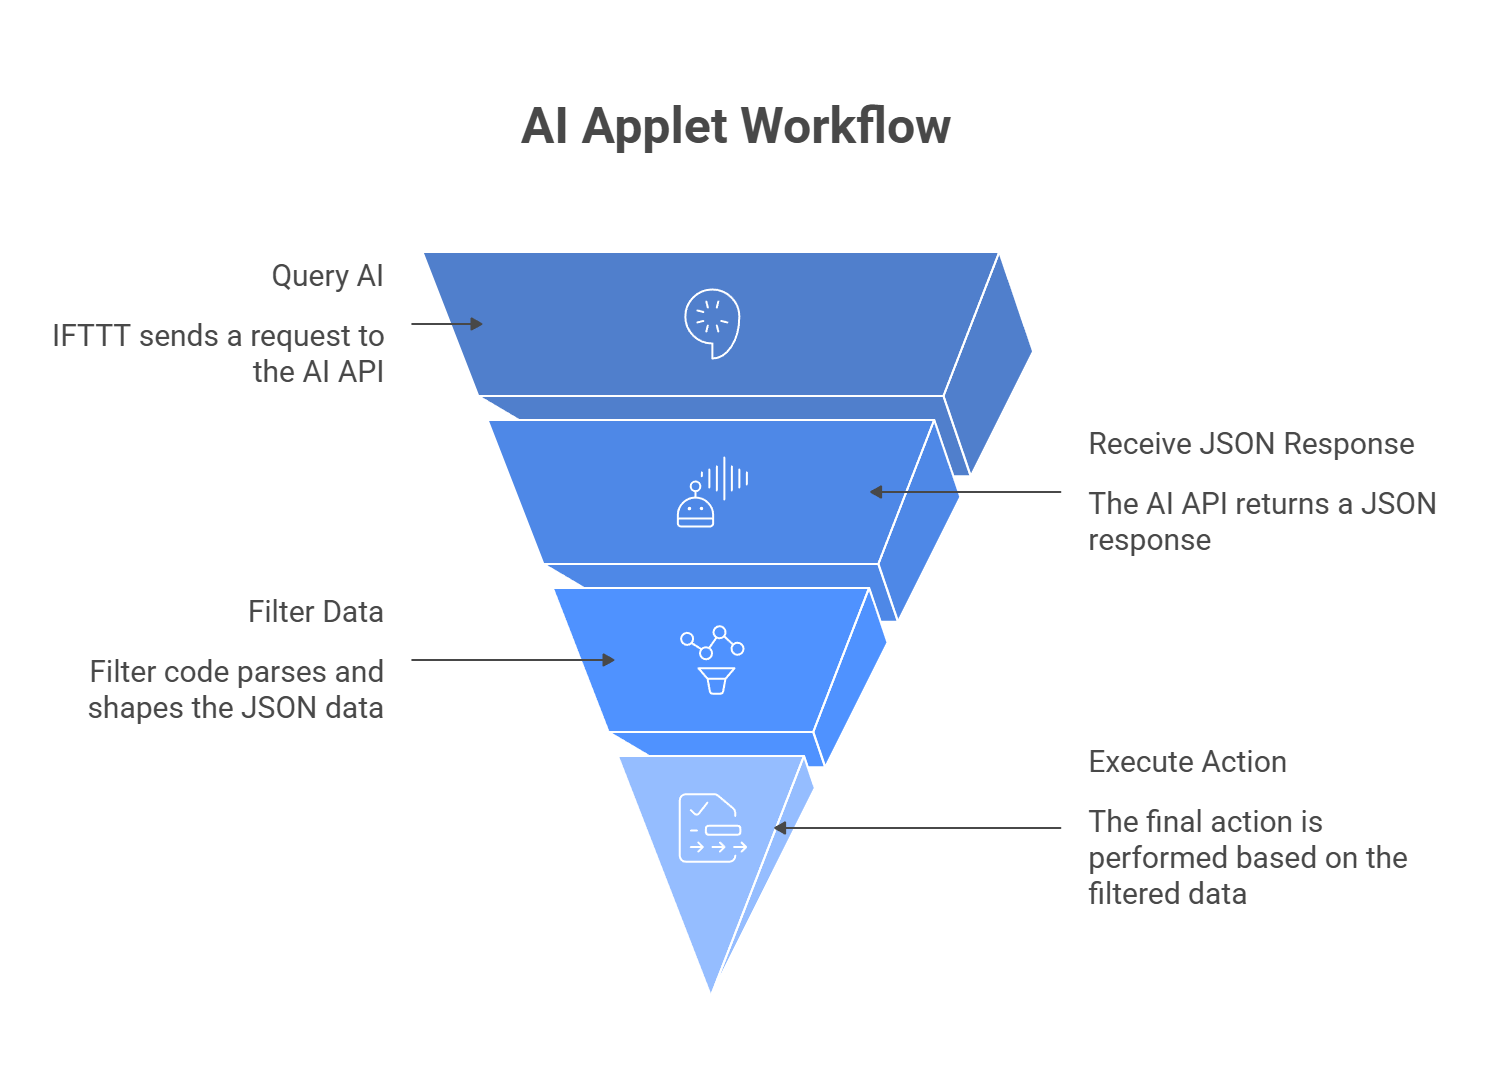
How an AI Applet on IFTTT actually works
If you want IFTTT to do more than a basic two-step automation, you need a slightly smarter setup. The usual pattern is not just If This, Then That. It is more like: something happens, IFTTT asks the AI for help, filter code cleans up the response, then the final action runs. IFTTT’s own docs describe Applets as flows built from triggers, queries, and actions, and its Webhooks query with JSON response is designed to return the JSON body so you can parse it with filter code.
The trigger
This is what starts the Applet. It could be a phone button, a new Gmail event, a smart-home sensor, or some other supported app event. In IFTTT’s structure, the trigger is the part that tells the Applet to begin.
The query
This is the part that makes the AI call possible. Instead of jumping straight from trigger to action, you use a query, usually Make a web request with JSON response. That query sends the request to your AI API and returns the JSON response body back into the Applet. IFTTT explicitly says this query returns the JSON response body and that you can use filter code to parse it.
The filter code
This is the bridge between the raw response and the useful output. AI APIs usually send back nested JSON, and IFTTT will not magically know which field you care about. Filter code lets you add JavaScript inside the Applet so you can parse the response, extract the text you want, and shape the data before the action runs. IFTTT’s help docs also note that JSON bodies can be parsed with filter code.
The action
This is the final step, the part where the AI result actually gets used. That could mean sending yourself a Telegram message, writing a row into Google Sheets, or triggering some smart-home response based on the AI output. In IFTTT’s model, actions are the result of the Applet run.
So the full flow looks like this:
Trigger → Query → Filter Code → Action
That extra middle layer is what makes the setup feel much more useful. Without it, you just have a basic automation. With it, you get something that can actually react to data in a smarter way.
Step by step: connect your app to an AI API with IFTTT
To build this kind of AI Applet, you will need IFTTT Pro+. IFTTT’s current plans and help pages say queries and filter code are Pro+ features, so the free plan and regular Pro plan are not enough for this setup.
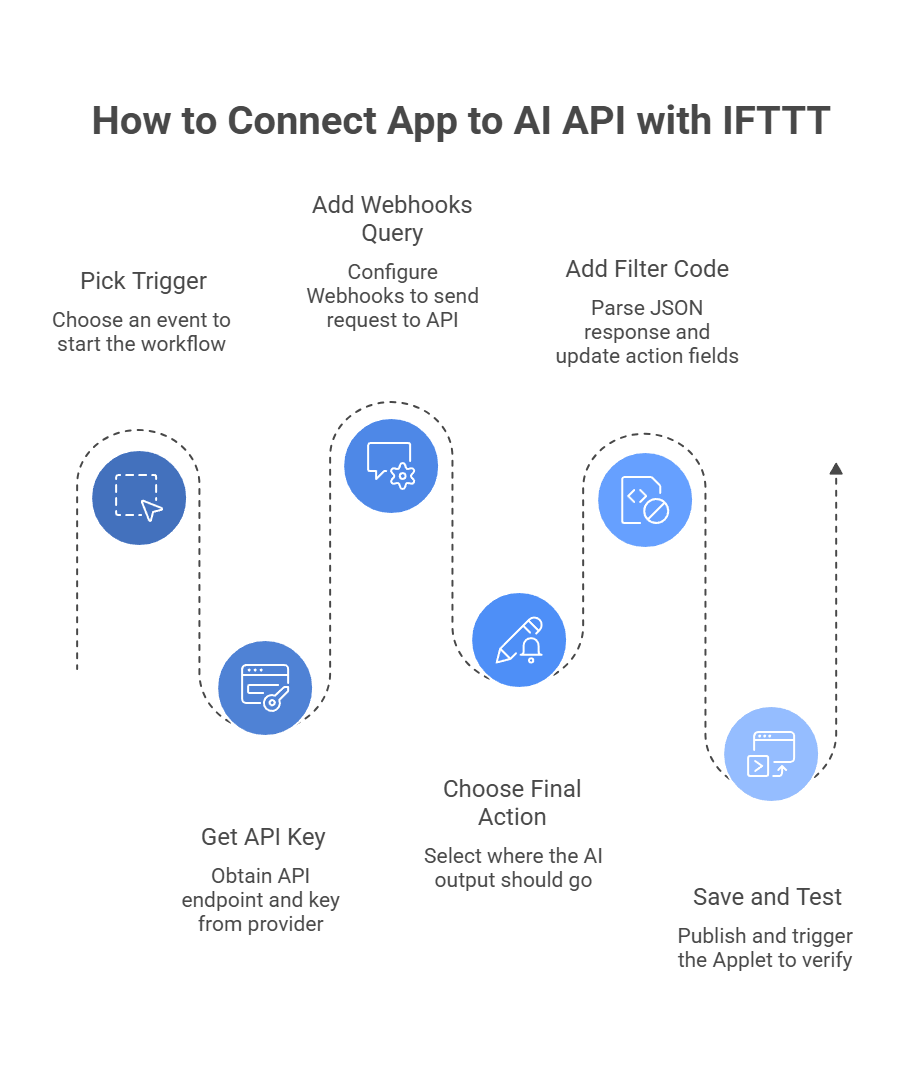
Step 1: Pick your trigger
Start in IFTTT and click Create.
Then click If This and choose the event that should start the workflow. For a simple test, the Button widget is a good option because it gives you a button you can tap on your phone to run the Applet manually.
This is the easiest way to test the whole AI flow before you connect it to something messier like email, location, or a smart-home event.
Step 2: Get your AI API key
Before you build the web request, you need an API endpoint and a key.
You can use a single provider, but if you want more flexibility, you can also use a unified gateway such as llmapi.ai. That gives you one key and one endpoint while keeping the option to change models later without rebuilding the Applet.
That part matters more than it sounds. If the model choice changes later, it is much easier to swap the backend than rebuild the whole automation.
Step 3: Add the Webhooks query
Now add the AI step.
Click the + button between the trigger and action, search for Webhooks, and choose Make a web request with JSON response. IFTTT’s Webhooks docs say this query returns the JSON response body, and that you can parse it with filter code.
Then fill it in like this:
- URL: your AI endpoint, such as https://api.llmapi.ai/v1/chat/completions.
- Method: POST.
- Content Type: application/json.
- Additional Headers: Authorization: Bearer YOUR_API_KEY.
In the Body field, send valid JSON. A simple starter example looks like this:
{

  "model": "gpt-4o",

  "messages": [

    {

      "role": "system",

      "content": "You are a witty assistant. Tell me a short, 2-sentence joke about automation."

    }

  ]

}
If your trigger includes text, you can insert an Ingredient into the prompt instead of hardcoding everything.
Step 4: Choose the final action
Next, click Then That and pick where the AI output should go.
For a simple test, Notifications works well. Choose Send a rich notification and put in placeholder text for now. You will replace it in the next step with the real AI output.
Step 5: Add filter code to read the AI response
Now for the part that makes the response usable.
Go back to the Applet overview and click the Filter icon between the query and the action. IFTTT says filter code runs after the trigger fires and can change action field values before the action runs.\
Inside the JavaScript editor, parse the JSON response and pass the text to the notification.
A typical structure looks like this:
// Get the raw response body from the Webhooks query

let rawResponse = MakerWebhooks.makeWebRequestQueryJson.ResponseBody;

// Parse the JSON

let jsonObject = JSON.parse(rawResponse);

// Extract the model's reply

let aiText = jsonObject.choices[0].message.content;

// Replace the notification text

IfNotifications.sendRichNotification.setMessage(aiText);

IfNotifications.sendRichNotification.setTitle("AI Assistant:");
One small note here: the exact object path can vary a bit depending on the API response. So if your provider returns a different JSON structure, this line may need a small tweak:
let aiText = jsonObject.choices[0].message.content;
Step 6: Save and test it
Save the Applet and publish it.
Then trigger it from your phone or test source. If everything is set up right, IFTTT will:
- Catch the trigger.
- Send the request to the AI API.
- Parse the JSON response.
- Send the final text to your chosen action.
And yes, that means one button tap can turn into a joke, summary, alert, or any other AI response you want.
One useful bonus: IFTTT now also offers filter code generators in the web Applet composer for Pro+ users, which can speed up the setup if you do not want to write every line manually.
Common IFTTT + AI problems to watch for
IFTTT is handy for lightweight AI automations, but it can break fast if the JSON is messy, the response is too slow, or the trigger fires too often. Here is the cleaner version:
| Pitfall | What goes wrong | How to avoid it |
| Broken JSON payloads | Quotes, line breaks, or messy text can break the request and trigger a 400 error. | Clean the text with Filter Code before sending it. |
| Slow AI responses | If the model takes too long, the request fails. | Use shorter prompts and faster models. |
| Wrong plan level | Lower tiers do not support the full query + parsing setup. | Check that you are on Pro+ before building. |
| Too many triggers at once | A noisy trigger can send too many requests and hit limits. | Use quieter triggers or add guardrails in filter code. |
| Parsing the wrong field | The AI reply may sit deep inside the JSON, so the action sends blank output. | Test the response and extract the exact field you need. |
| Using IFTTT like a full backend | Heavy logic or long workflows can hit platform limits. | Keep IFTTT for fast, simple AI tasks. |
So the safe rule is pretty simple: keep the request fast, keep the JSON clean, make sure you are on Pro+, and do not let a noisy trigger spam your AI endpoint.
Make your IFTTT AI automations more flexible behind the scenes
IFTTT is one of the easiest ways to connect AI with everyday actions in the physical and digital world. Once you start using Webhook Queries and Filter Code, simple triggers can become much more useful. A smart home event, a saved song, or a form submission can all trigger AI-driven logic that feels far more customized and intelligent.
The catch is that IFTTT workflows depend on speed and consistency. When requests take too long or a provider hits a limit, the automation can fail quietly in the background. That makes your setup less dependable, especially when it runs without someone watching it.
A cleaner way to handle that is to send your IFTTT webhooks through LLMAPI. That gives you one unified AI gateway instead of tying everything to a single provider. It also gives your automations more room to stay stable when one model is slow, unavailable, or no longer the right fit.
Why use LLMAPI with IFTTT?
- One API instead of juggling multiple providers.
- Built-in fallback options for steadier automations.
- More flexible model routing when speed matters.
- Less risk of silent failures from provider issues.
- Easier scaling as your workflows grow.
If you want your IFTTT AI workflows to feel smarter without becoming harder to maintain, LLMAPI is a strong layer to add. It helps keep the automation simple on the surface while making the AI side more flexible and reliable underneath.
FAQs
Do I need a paid IFTTT account to connect to AI APIs?
Usually, yes. To send API requests and then transform the response inside IFTTT, you typically need Queries and Filter Code, which are tied to IFTTT Pro+.
How does using LLMAPI through IFTTT Webhooks help prevent failures?
IFTTT Webhooks have short timeout limits. If a model is slow, the Applet can fail. Routing through LLMAPI lets you use fallbacks to faster equivalent models, which helps keep responses within IFTTT’s limits.
Can I trigger an IFTTT AI workflow from a smart home device?
Yes. That’s one of IFTTT’s strengths. You can trigger from motion sensors/cameras or voice assistants, send the event to an AI for analysis, then use the result to run another smart home action.
How do I handle different model formats in my IFTTT payload when using LLMAPI?
LLMAPI standardizes requests and responses to a consistent schema, so you usually don’t need to rewrite your payload or Filter Code. To switch models, you typically just update the model value (for example, “gpt-4o” → “claude-3-5-sonnet”).
Why am I getting a “400 Bad Request” from an IFTTT Webhook Query?
Most of the time it’s malformed JSON. Ingredients like email bodies can include quotes and line breaks that break JSON formatting. Check that your payload is valid JSON and that your Content-Type is set to application/json.