Rate limits are one of those problems that look small during testing and suddenly become very real in production. Your demo works fine with five requests. Then users arrive, traffic spikes, one provider starts returning 429 errors, another model slows down, and your app has to decide what to do next.
For LLM apps, this gets even messier because every request has two moving parts: the number of calls and the number of tokens. A short classification prompt and a long document-analysis prompt may both count as one request, but they use very different amounts of capacity and money.
That is why rate limits and fallbacks should be part of the architecture from the beginning. With LLMAPI, teams can route requests across 200+ models, manage provider keys in one place, monitor usage and reliability, compare model costs, and use built-in fallback handling through a unified gateway. This gives developers a cleaner way to build around provider limits instead of hardcoding one model into the app and hoping it always works.
In this guide, we’ll walk through how rate limits work, when to retry, when to fallback, how to design a fallback chain, and how to use LLMAPI as the control layer for more reliable multi-provider AI workflows.
This guide was prepared by a technical content team with 6 years of experience researching APIs, AI infrastructure, SaaS tools, and developer platforms. Our work focuses on turning technical documentation, pricing details, provider behavior, and engineering patterns into practical guides for developers and product teams.
For this article, we reviewed official rate-limit documentation from OpenAI, Anthropic, and Google Gemini, along with Google Cloud’s guidance on reducing 429 errors on Vertex AI. We also looked at recent research on LLM routing, multi-provider workflows, tool-output handling, and multi-tenant SaaS security.
Our goal is practical: explain how teams can keep LLM apps stable when provider limits, traffic spikes, outages, and model differences start affecting real users.
The best setup is usually a layered one:
| Layer | What it does | Why it matters |
| Request pacing | Slows down traffic before limits are hit | Prevents avoidable 429 errors |
| Token budgeting | Tracks input/output token usage per model | Protects TPM limits and cost |
| Retry with backoff | Retries temporary failures after a delay | Recovers without hammering the provider |
| Fallback routing | Sends failed requests to another model/provider | Keeps the app working during limits or outages |
| Circuit breaker | Stops sending traffic to unhealthy models | Prevents repeated failures |
| Queueing | Buffers non-urgent tasks | Keeps batch jobs from hurting live traffic |
| Monitoring | Tracks error rate, latency, spend, and fallback usage | Helps teams fix root causes instead of guessing |
In LLMAPI, the practical pattern looks like this:
That last part matters a lot. Fallbacks save availability, but they can also change cost, response quality, latency, and output style.
Rate limits control how much traffic your app can send to an API within a specific time window. Traditional APIs often limit simple request volume, such as “100 requests per minute.” LLM APIs usually add token-based limits because model usage depends heavily on prompt size and response length.
For example, Gemini API documentation explains that rate limits are commonly measured across requests per minute (RPM), input tokens per minute (TPM), and requests per day (RPD). Anthropic’s Claude API docs describe rate limits across requests per minute, input tokens per minute, and output tokens per minute for each model class.
That means your app can hit a limit in several ways:
| Limit type | What it means | Example problem |
| RPM | Requests per minute | Too many users send prompts at once |
| TPM | Tokens per minute | A few long prompts consume the whole token budget |
| RPD | Requests per day | A free or lower-tier project hits daily quota |
| Concurrency | Requests running at the same time | Too many long generations run in parallel |
| Output token limit | Response length exceeds allowed output | The model stops early or fails |
| Provider capacity | Shared capacity is temporarily constrained | Valid requests receive 429/503 responses |
The hard part is that users usually do not care which limit was hit. They only see that the app slowed down or failed. So your architecture needs to decide what to do before the error becomes a bad user experience.
LLM rate limits are harder to manage than many normal API limits because usage is less predictable.
A search request or payment API call usually has a fairly stable shape. A model request can vary wildly. One user asks for a one-sentence answer. Another pastes a 30-page contract. A third user starts an agent workflow that calls the model 15 times in a row.
That creates three practical problems:
| Problem | What happens |
| Token spikes | A small number of long prompts can burn through TPM quickly |
| Burst traffic | A sudden traffic spike can trigger 429 errors even if average usage looks fine |
| Agent loops | Multi-step agents can multiply calls without users noticing |
Google’s guide to reducing 429 errors on Vertex AI recommends smart retries, global routing, context caching, prompt optimization, and traffic shaping. Those ideas apply beyond Vertex AI because the underlying problem is the same: LLM workloads need pacing, routing, and token control.
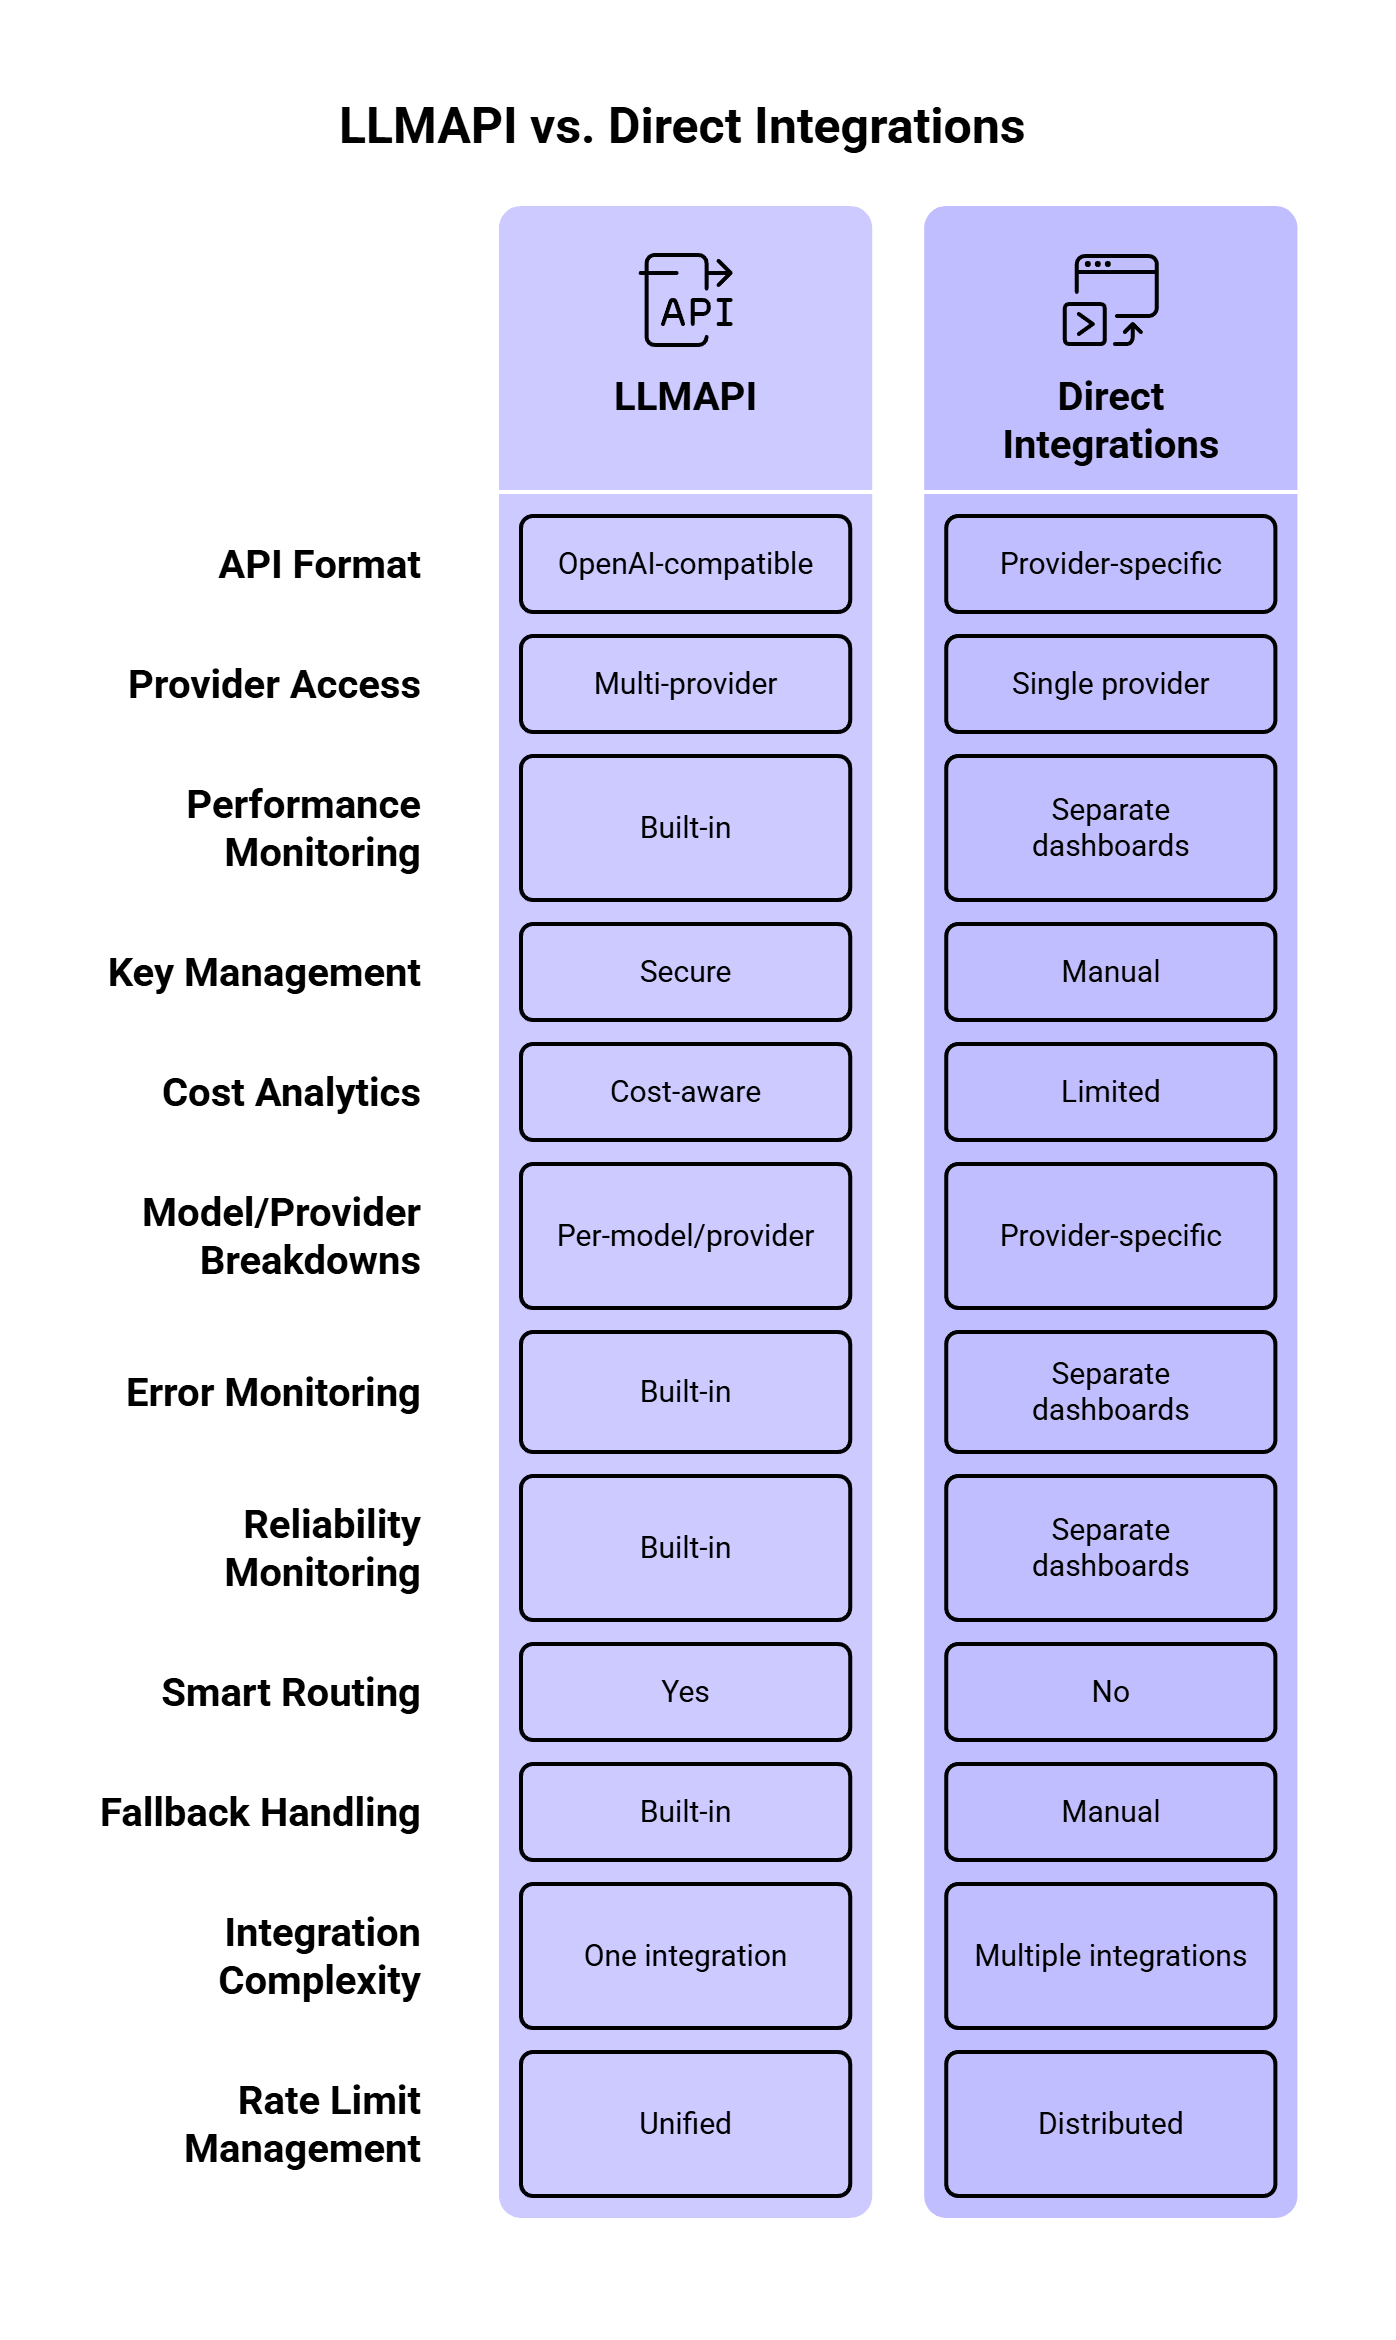
LLMAPI works as a unified gateway between your application and multiple LLM providers. According to the LLMAPI website, the platform supports an OpenAI-compatible API format, multi-provider access, performance monitoring, secure key management, cost-aware analytics, per-model/provider breakdowns, error and reliability monitoring, smart routing, and built-in fallback handling.
That matters because direct model integrations get messy fast.
If your app calls only one provider directly, rate-limit handling is simple at first. You check for a 429 error, wait, and retry. Then your product grows. You add another model for cheaper classification, another provider for long-context tasks, another backup for outages, and another model for premium users. Suddenly, rate limits live in five dashboards and every provider reports errors differently.
LLMAPI gives teams one place to manage that routing layer. The app can keep one integration while LLMAPI handles provider choice, model routing, usage tracking, and fallback behavior behind the scenes.
Most LLM teams eventually run into these errors:
| Error / signal | What it usually means | Best response |
| 429 Too Many Requests | Rate limit or quota exceeded | Wait, retry with backoff, or fallback |
| 503 Service Unavailable | Provider overload or temporary outage | Retry, then fallback |
| Timeout | Model took too long or connection failed | Retry once, then fallback or queue |
| Context length error | Prompt is too large | Reduce prompt, summarize context, or use a larger-context model |
| Quota/billing error | Account quota, tier, or billing issue | Stop retries and alert the team |
| Safety/policy error | Provider rejected the request | Avoid fallback unless policy behavior is understood |
A key detail: failed retries can still consume capacity. OpenAI’s rate-limit guide recommends exponential backoff with jitter and also notes that unsuccessful requests contribute to per-minute limits. So if your app retries too aggressively, it can make the problem worse.
Retries and fallbacks solve different problems.
A retry is useful when the same provider may recover quickly. A fallback is useful when waiting is likely to hurt the user experience or when a provider/model is temporarily unavailable.
| Situation | Retry first? | Fallback? | Why |
| Temporary 429 with Retry-After header | Yes | Maybe | The provider tells you when to retry |
| Short timeout | Yes | Yes after 1–2 retries | Could be a network blip |
| Provider outage | No or minimal | Yes | Waiting may waste time |
| Model-specific capacity issue | Maybe | Yes | Another model may have capacity |
| Context length error | No | Use larger-context model or shorten prompt | Same request will keep failing |
| Billing/quota exhaustion | No | Yes, if another provider is configured | Retrying the same route will fail |
| Safety/policy rejection | Usually no | Carefully | Providers may behave differently |
A good LLMAPI setup should treat 429 errors, timeouts, provider overload, and quota issues differently. One generic “retry everything three times” rule is easy to build, but it creates messy production behavior.
Before adding fallback logic, define what each user, team, environment, and workload is allowed to consume.
A good policy usually includes:
| Policy | Example |
| Per-user RPM | 20 chat requests per minute |
| Per-team TPM | 500K tokens per hour |
| Per-environment limits | Lower limits for staging and dev |
| Per-model access | Premium models only for paid users |
| Daily spend cap | Stop or downgrade after budget threshold |
| Priority levels | Production traffic gets priority over batch jobs |
This matters because rate limits should protect both reliability and cost. A runaway script in staging should never consume the same provider quota as a live customer workflow.
LLMAPI’s cost-aware analytics and per-model/provider breakdowns are useful here because teams can see requests, tokens, spend, and provider-level usage from one dashboard.
When a provider returns a temporary rate-limit error, immediate retries are usually a bad idea. If 1,000 requests fail and all 1,000 retry instantly, you get a second traffic spike right after the first one.
OpenAI recommends random exponential backoff for rate-limit errors. Google’s Vertex AI guidance also recommends exponential backoff with jitter for temporary overload errors like 429 and 503.
A simple pattern:
async function retryWithBackoff<T>(
  fn: () => Promise<T>,
  maxRetries = 3,
  baseDelayMs = 500
): Promise<T> {
  let lastError: unknown;

  for (let attempt = 0; attempt <= maxRetries; attempt++) {
    try {
      return await fn();
    } catch (error: any) {
      lastError = error;

      const retryable =
        error.status === 429 ||
        error.status === 503 ||
        error.code === "ETIMEDOUT";

      if (!retryable || attempt === maxRetries) {
        throw error;
      }

      const jitter = Math.random() * 250;
      const delay = baseDelayMs * Math.pow(2, attempt) + jitter;

      await new Promise((resolve) => setTimeout(resolve, delay));
    }
  }

  throw lastError;
}
This gives the provider time to recover and spreads retry traffic across slightly different moments.
When a provider gives you a retry window, use it.
Anthropic’s rate-limit documentation says that when a limit is exceeded, the API returns a 429 error with a retry-after header indicating how long to wait. This is better than guessing.
A practical rule:
function getRetryDelayMs(error: any, fallbackDelayMs = 1000): number {
  const retryAfter = error.headers?.["retry-after"];

  if (retryAfter) {
    const seconds = Number(retryAfter);
    if (!Number.isNaN(seconds)) {
      return seconds * 1000;
    }
  }

  return fallbackDelayMs;
}
Use provider headers first, then your own exponential backoff rule when no header is available.
Fallbacks keep the app running when the primary model cannot serve a request. In LLMAPI, this is where multi-provider routing becomes valuable.
A fallback chain should be intentional. A cheap model may work as a fallback for classification, but a legal review assistant may need a model with similar reasoning quality. A fast model may be fine for internal summaries, while customer-facing responses may need stronger guardrails and better instruction-following.
A useful fallback chain can look like this:
| Task type | Primary model | Fallback 1 | Fallback 2 | Notes |
| Simple classification | Low-cost fast model | Similar cheap model | Stronger model | Optimize for cost |
| Customer support reply | Balanced model | Similar quality model | Premium model | Keep tone and quality stable |
| Long document summary | Long-context model | Another long-context model | Queue for later | Avoid context errors |
| Internal data extraction | Cost-efficient model | Deterministic parser + LLM | Queue | Accuracy matters more than speed |
| Real-time chat | Fast model | Another fast model | Short apology + retry option | Latency matters most |
Orq’s AI Router retry/fallback docs recommend keeping fallback chains short, using a maximum of three fallback models, and choosing models with similar capabilities. That is a good production rule. Long fallback chains can hide problems, increase latency, and create output inconsistency.
A circuit breaker temporarily stops traffic from going to a provider or model after repeated failures.
Without a circuit breaker, your app may keep sending requests to a route that is already failing. That wastes time, increases user-facing latency, and can burn more rate-limit capacity.
A simple circuit breaker rule:
| Signal | Action |
| Error rate above 20% for 2 minutes | Stop routing new traffic to that model |
| p95 latency above threshold | Reduce traffic share |
| Repeated 429s | Pause route until reset window |
| Provider outage | Switch to fallback provider |
| Recovery checks pass | Gradually restore traffic |
Kong’s AI Gateway docs list retry and fallback, rate limiting, semantic routing, load balancing, metrics, audit logs, and cost control as gateway capabilities. These features work best together. Rate limits tell you when traffic is too high, fallbacks provide another path, and circuit breakers keep unhealthy paths from dragging down the whole system.
Live user requests and background jobs should have different limits. A chatbot response needs to come back quickly. A nightly data-enrichment job can wait. If both share the same provider quota, a batch job can accidentally break the live app.
A better setup:
| Traffic type | Priority | Recommended handling |
| Live chat | High | Fast model, short retries, quick fallback |
| Support automation | High | Reliable model, quality-matched fallback |
| Bulk summarization | Medium | Queue, batch, lower-cost model |
| Offline tagging | Low | Delay-friendly queue |
| Experiments | Low | Strict budget and token caps |
Google’s Vertex AI guidance suggests using different consumption patterns for different workloads, including provisioned throughput for essential real-time traffic and batch or flexible options for latency-tolerant jobs. The same idea applies when you design LLMAPI routing policies.
A lot of rate-limit problems are token problems in disguise.
If your prompt sends the same long system instructions, full conversation history, oversized JSON schemas, and unused context on every request, you burn through TPM faster than needed.
Ways to reduce token pressure:
| Technique | How it helps |
| Summarize long chat history | Reduces repeated context |
| Cache repeated prompts | Avoids paying for similar work again |
| Trim unused documents | Reduces input tokens |
| Use smaller models for simple tasks | Saves premium quota |
| Set response length caps | Controls output token usage |
| Compress structured context | Keeps prompts smaller |
| Split long workflows | Sends each model only what it needs |
Google recommends context caching, prompt optimization, and traffic shaping as ways to reduce 429 errors on Vertex AI. LLMAPI also highlights semantic caching and cost-aware routing, which can help teams avoid paying for identical or similar requests repeatedly.
Fallbacks can keep the app available, but they can also change the response.
Different models may vary in tone, formatting, refusal behavior, JSON reliability, tool-calling behavior, and latency. So every fallback should have quality checks.
Track these fields:
| Metric | Why it matters |
| Fallback rate | Shows how often primary routes fail |
| Retry rate | Reveals provider pressure or bad pacing |
| Fallback model output quality | Confirms backup models can do the task |
| JSON/schema failure rate | Shows whether fallback models break structured output |
| p95 latency | Measures user impact |
| Cost per successful request | Shows fallback cost impact |
| User correction rate | Helps detect worse fallback answers |
Recent research makes this point stronger. The paper How Good Are LLMs at Processing Tool Outputs? found that LLMs can struggle with structured tool outputs, and different processing strategies caused performance differences from 3% to 50%. If your primary model reliably returns clean JSON and your fallback model does not, the fallback can keep the request alive while still breaking the workflow.
So for structured outputs, validate the response before returning it or sending it to the next step.
Rate limits and fallbacks are hard to debug without logs.
At minimum, log:
{
  "request_id": "req_123",
  "user_id": "user_456",
  "route": "support_reply",
  "primary_model": "model_a",
  "final_model": "model_b",
  "fallback_used": true,
  "retry_count": 2,
  "error_code": 429,
  "latency_ms": 4200,
  "input_tokens": 1800,
  "output_tokens": 420,
  "estimated_cost": 0.014
}
You want to answer questions like:
LLMAPI’s dashboard features, including cost-aware analytics, per-model/provider breakdowns, and reliability monitoring, are useful because rate-limit debugging needs visibility across models and providers.
A raw 429 error is awful UX.
For internal tools, you can be direct:
We hit the current model’s rate limit. Retrying in a few seconds.
For customer-facing apps, keep it calmer:
This request is taking longer than usual. We’re trying another model now.
For queued tasks:
Your request is queued and will run when capacity is available.
Avoid showing provider names, quota numbers, or internal fallback chains to end users unless the product is built for developers. Most users only need to know whether they should wait, retry, or expect a delayed result.
Here is a simple production-ready flow:
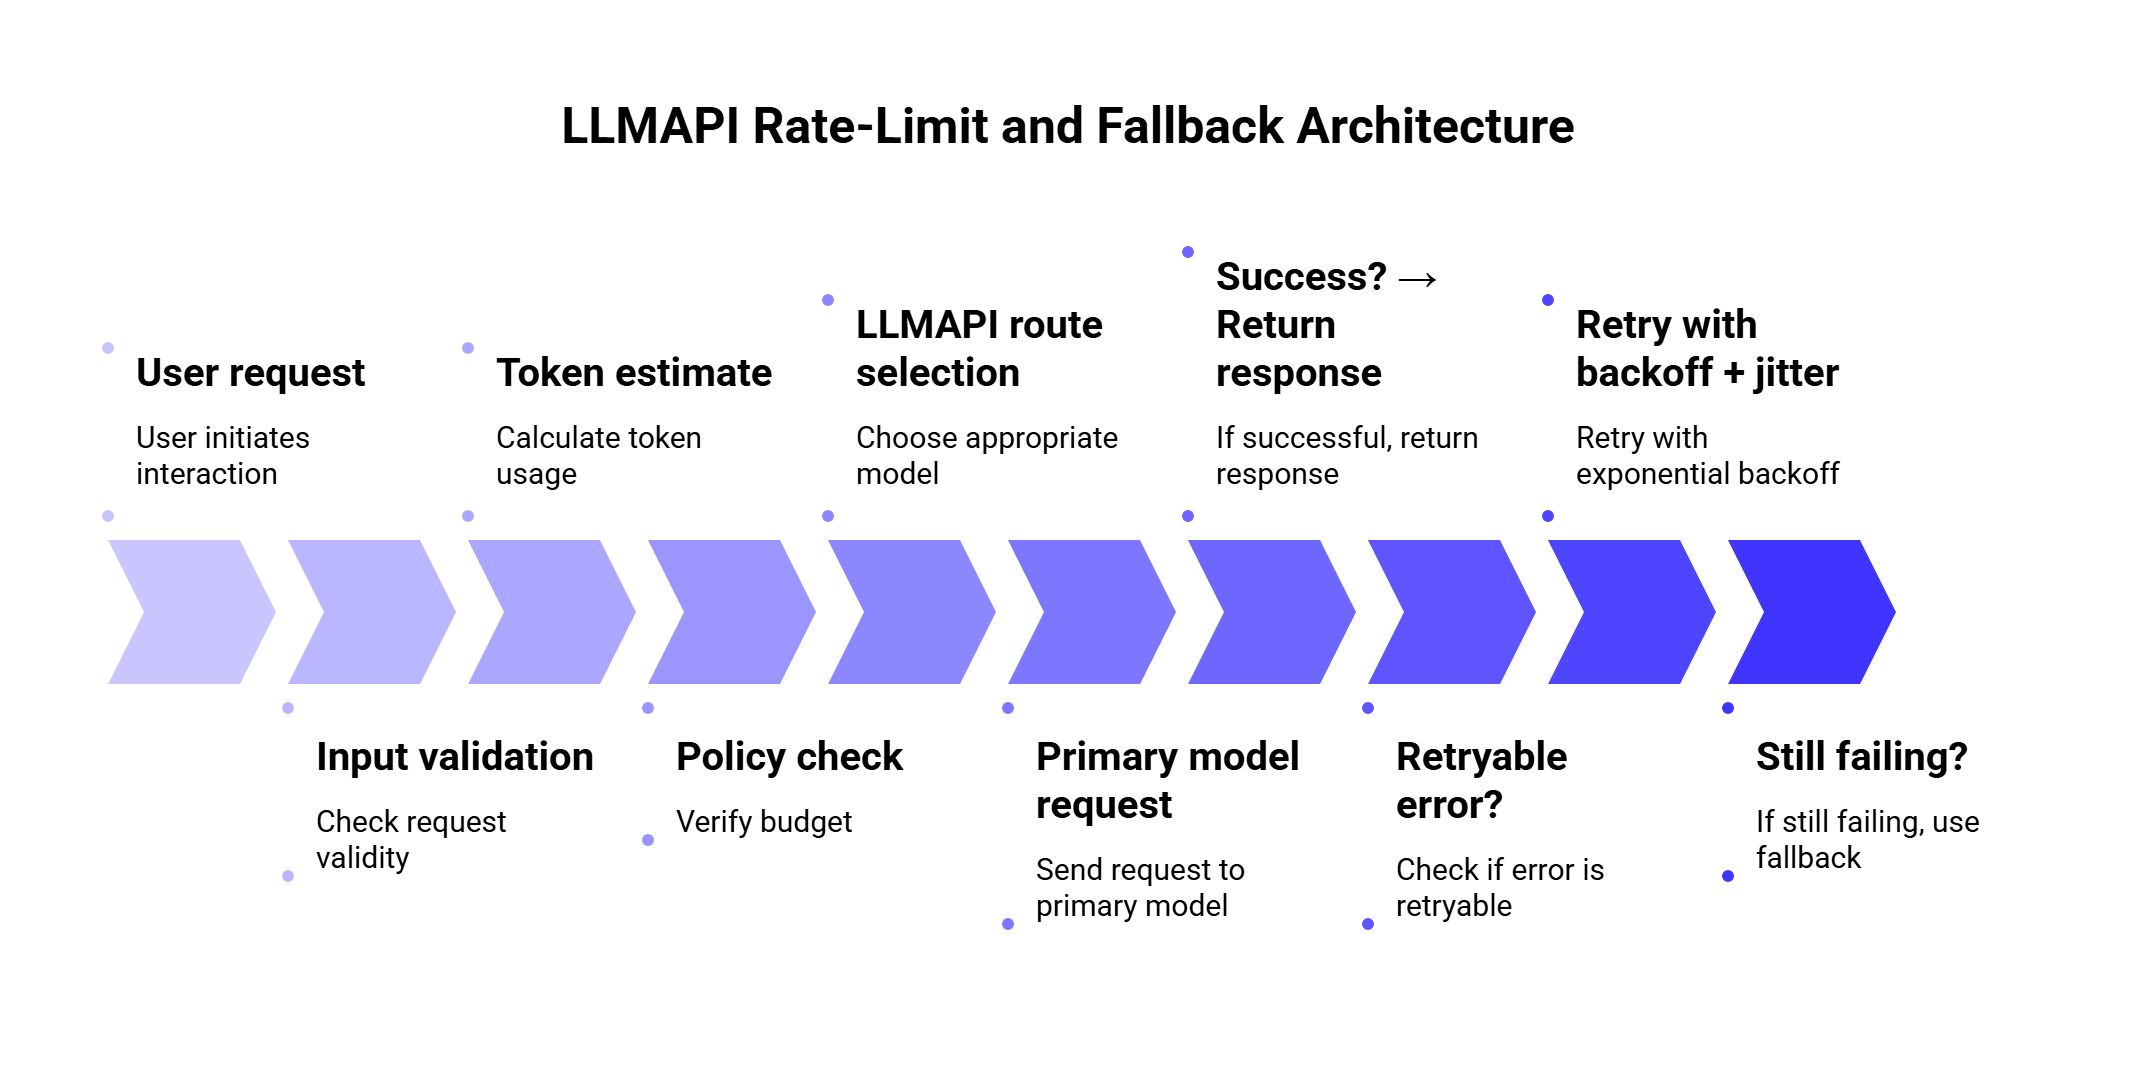
This gives you a safer default because every request goes through budget checks, routing, retries, fallback, validation, and monitoring.
Here is a simplified TypeScript-style example. The exact fields depend on your app and LLMAPI setup, but the logic is the important part.
type LLMRequest = {
  route: "support_reply" | "classification" | "summary";
  prompt: string;
  userId: string;
};

const fallbackChains = {
  support_reply: ["primary-balanced", "backup-balanced", "premium-safe"],
  classification: ["cheap-fast", "backup-cheap", "balanced"],
  summary: ["long-context-primary", "long-context-backup"]
};

async function callWithFallback(request: LLMRequest) {
  const models = fallbackChains[request.route];

  let lastError: any;

  for (const model of models) {
    try {
      const response = await retryWithBackoff(() =>
        callLLMAPI({
          model,
          prompt: request.prompt,
          metadata: {
            user_id: request.userId,
            route: request.route
          }
        })
      );

      await validateResponse(response, request.route);

      return {
        response,
        final_model: model,
        fallback_used: model !== models[0]
      };
    } catch (error: any) {
      lastError = error;

      if (!isFallbackSafe(error)) {
        throw error;
      }

      await markRouteHealth(model, error);
    }
  }

  throw lastError;
}

function isFallbackSafe(error: any) {
  return (
    error.status === 429 ||
    error.status === 503 ||
    error.code === "ETIMEDOUT" ||
    error.code === "PROVIDER_UNAVAILABLE"
  );
}
The key idea: fallback on capacity and reliability problems. Be more careful with safety errors, validation errors, and context-length problems because switching models may create inconsistent behavior.
Usually two or three is enough.
One primary model and two fallbacks gives you a good balance between availability and control. Longer chains can create long waits, unexpected cost jumps, and inconsistent answers.
| Fallback setup | Best for |
| 1 primary + 1 fallback | Simple apps |
| 1 primary + 2 fallbacks | Most production apps |
| Cost-based routing + quality fallback | High-volume SaaS |
| Provider-diverse fallback | Apps that need higher availability |
| Queue after fallback failure | Batch or non-urgent work |
A practical chain should answer four questions:
If the answer to question four is unclear, add validation before shipping the output.
Fallbacks can quietly increase spend.
For example, imagine your default classification route uses a low-cost model. During traffic spikes, the system falls back to a premium model. The app stays available, which is good. Your bill also jumps, which may be very bad.
Use different fallback rules by task:
| Task | Cost strategy |
| Classification | Fallback to similar low-cost model first |
| Internal summaries | Queue before using premium model |
| Customer support | Use stronger fallback if user impact is high |
| Legal/finance content | Prefer quality over cost |
| Batch enrichment | Delay instead of escalating cost |
Recent routing research supports this kind of thinking. The 2026 paper Robust Batch-Level Query Routing for Large Language Models under Cost and Capacity Constraints studies routing under cost, GPU resource, and concurrency limits. The authors report that robust routing improved accuracy by 1–14% over non-robust counterparts, while batch-level routing outperformed per-query methods by up to 24% under adversarial batching.
That research is a useful reminder: routing decisions should consider cost and capacity together. A fallback that keeps quality high while destroying budget creates another production problem.
Fallbacks can also affect security and compliance.
If the primary route uses a provider approved for sensitive data, the fallback provider should meet the same requirements. Otherwise, a rate-limit event could accidentally send sensitive user content to a provider that was never approved for that data type.
Before enabling fallbacks, check:
| Security question | Why it matters |
| Can this provider process the same data category? | Prevents policy violations |
| Are logs stored safely? | Protects user prompts and outputs |
| Are API keys managed centrally? | Reduces leakage risk |
| Can teams audit fallback usage? | Helps compliance and debugging |
| Are tenant boundaries preserved? | Protects multi-tenant SaaS apps |
The 2026 paper Security Challenges of LLM Integration in Multi-Tenant SaaS identified 18 vulnerability classes and found that 12 had stronger impact in multi-tenant deployments than in single-tenant systems. That matters for LLM gateways because fallback routing, shared tools, and centralized provider access all need careful controls.
LLMAPI’s secure key management and centralized team access can help reduce key sprawl, but teams still need clear rules for which providers can handle which workloads.
Structured output deserves special care.
If your app expects JSON, the fallback model must follow the same schema. Otherwise, a successful fallback can still break the product.
Example:
{
  "intent": "refund_request",
  "urgency": "high",
  "language": "es",
  "summary": "Customer received a damaged order and needs help."
}
Validation checklist:
| Check | Example |
| Valid JSON | Can the response be parsed? |
| Required fields | Are intent, urgency, and summary present? |
| Allowed values | Is urgency one of low, medium, high? |
| Language consistency | Does response language match the request? |
| Safety constraints | Did the model include disallowed content? |
If validation fails, you can retry once with a stricter prompt, fallback to another model, or route to a queue/manual review.
Fast retries can make rate-limit issues worse. Use provider headers, exponential backoff, and jitter.
This keeps requests alive, but it can wreck cost control. Match fallback quality and cost to the task.
A fallback model should be able to produce the same format, tone, and task quality. If the response changes too much, users will notice.
Some teams track requests and forget tokens. With LLMs, token usage often matters more than request count.
A background job should never consume the same critical capacity as a live user flow without limits.
If a fallback happens and nobody can see it, debugging becomes guesswork.
Different providers can handle safety and compliance differently. Treat policy failures carefully.
Use this checklist before going live:
| Area | What to configure |
| Routing | Primary model per task type |
| Fallbacks | 1–2 backup models with similar capability |
| Retry policy | Exponential backoff, jitter, retry cap |
| Error handling | Different rules for 429, 503, timeout, quota, context errors |
| Token budgeting | Per-user/team/model token limits |
| Cost controls | Daily/monthly spend caps and model downgrade rules |
| Monitoring | Error rate, latency, retries, fallback rate, cost |
| Validation | JSON/schema checks for structured outputs |
| Security | Provider approvals by data type |
| User messaging | Clear messages for delay, queue, or temporary failure |
| Use case | Primary route | Fallback behavior |
| Chatbot | Fast balanced model | Retry once, then use similar model |
| Support assistant | Reliable model | Fallback to quality-matched provider |
| Bulk summarization | Cheap model | Queue before premium fallback |
| Intent classification | Low-cost model | Fallback to another low-cost model |
| Document extraction | Structured-output model | Validate JSON, retry with stricter prompt |
| Internal analytics | Batch model | Delay during limits |
| Customer-facing legal content | Premium model | Fallback only to approved premium model |
A rate limit controls how many requests or tokens can move through your LLM workflow within a specific time window. In an LLM gateway setup, limits can apply by user, team, provider, model, route, or environment.
A 429 error usually means the request exceeded a rate limit or quota. The best response depends on the provider and error details. In many cases, you should wait, retry with exponential backoff, or route to a fallback model.
Many 429 errors should retry first, especially when the provider sends a Retry-After header. Fallback makes sense when waiting would hurt the user experience, the primary route is repeatedly failing, or another provider/model has available capacity.
Two or three models in a chain is usually enough. Use one primary route and one or two fallbacks with similar capability. Long chains add latency and make quality harder to control.
It depends on the task. For classification and internal workflows, cheaper fallbacks often make sense. For customer-facing, legal, finance, or high-stakes outputs, use quality-matched fallbacks.
LLMAPI helps by giving teams a unified gateway for provider access, routing, usage tracking, cost analytics, secure key management, and fallback handling. This makes it easier to manage rate limits across multiple models and providers from one layer.
Track 429 errors, retry count, fallback rate, p95 latency, token usage, model/provider spend, validation failures, and user-facing errors. These metrics show whether the system is healthy or quietly leaning too much on fallbacks.
Rate limits are normal in LLM apps. Provider capacity changes, traffic spikes, users send long prompts, and agents can create more calls than expected. The goal is to design for that reality before users feel it.
A strong LLMAPI setup should combine token-aware limits, smart retries, short fallback chains, circuit breakers, cost controls, and clear monitoring. Retry temporary failures. Fallback when the primary route is unavailable or over capacity. Queue work that can wait. Validate structured outputs before they move deeper into the system.
LLMAPI gives teams a cleaner way to manage this across providers. Instead of scattering rate-limit logic, API keys, model choices, and fallback rules across the application, teams can centralize more of that behavior in one gateway.
The best fallback strategy is the one users barely notice. The request may retry, reroute, or wait behind the scenes, but the product still feels stable.
A huge chunk of business data is still stuck in PDFs, scans, invoices, contracts, and other messy files. And yeah, older OCR tools often fall apart the second a layout changes.
That is why document parsing matters so much now. Modern APIs do more than pull text off a page. They can actually understand document structure, spot fields, follow tables across pages, and extract the data you need without all the old template pain.
So if you want to automate document-heavy workflows or feed cleaner data into your apps, these are the APIs worth looking at.
Older OCR tools mostly just pulled text off a page. That helped, but only up to a point. If the layout changed, the output usually got messy fast. Modern parsing APIs go further because they try to understand the document, not just read the words on it.
Based on enterprise adoption, performance on complex layouts, and overall developer experience, these are the five document extraction APIs that stand out right now.
LlamaParse is a favorite in the GenAI world. It is built for developers working on LLM apps and RAG pipelines, and it does a very good job turning messy PDFs into clean Markdown or structured JSON that is much easier to use downstream.
Key features:
Pricing: Free tier (1,000 pages/day). Premium pay-as-you-go starting at $0.003 per page.
Best for: AI developers, data scientists, and engineers building LLM apps that need to read complex PDFs.
| Pros | Cons |
| Excellent output for LLM workflows | Not built for traditional back-office finance teams |
| Affordable pay-as-you-go pricing | Limited UI for non-technical users |
| Handles complex multi-page tables well | Docs lean heavily toward Python users |
| Active, fast-moving open-source ecosystem | |
| Strong Markdown output for visual elements |
Google Cloud Document AI is a strong enterprise option. It is especially useful when you need scale, multilingual support, and custom extraction for document types that do not follow a standard format.
Key features:
Pricing: Tiered based on the processor. Custom extraction is typically around $10 per 1,000 pages.
Best for: GCP-based enterprises, logistics teams, and organizations handling large document volumes.
| Pros | Cons |
| Few-shot learning can cut training time a lot | IAM and permissions setup can be annoying |
| Strong handwriting support | Pricing can get confusing fast |
| Good built-in review UI | Heavy lock-in to Google Cloud |
| Pre-trained processors work well out of the box | |
| Excellent multilingual OCR |
Azure AI Document Intelligence, formerly Form Recognizer, is a strong fit for enterprise teams that care about structure, compliance, and Microsoft ecosystem integrations. It is especially good at preserving document hierarchy and reading order.
Key features:
Pricing: Starts around $1.50 per 1,000 pages for basic read APIs; up to $15-$50 per 1,000 for custom neural models.
Best for: Healthcare, finance, and compliance-heavy teams that may need on-prem or container-based deployment.
| Pros | Cons |
| Container deployment helps with privacy control | Azure portal can feel overly complex |
| Very good reading-order handling in multi-column docs | Custom neural training can take time and compute |
| Strong Microsoft ecosystem integration | High-volume custom extraction can get expensive |
| Strong compliance support | |
| Good signature and checkbox detection |
AWS Textract is the workhorse option. It is built for speed, scale, and transactional document processing. It may feel less flashy than more GenAI-heavy tools, but it is reliable for large-volume extraction jobs.
Key features:
Pricing: $1.50 per 1,000 pages for basic text; up to $15 per 1,000 for tables and queries.
Best for: AWS-native teams processing large numbers of receipts, forms, shipping docs, and other transactional files.
| Pros | Cons |
| Fits well into AWS serverless workflows | Less capable on messy narrative documents |
| Scales well for very large workloads | JSON output can be noisy and hard to work with |
| Query feature reduces template headaches | No polished built-in human review UI |
| Cost-effective at enterprise volume | |
| Fast synchronous processing |
Docsumo is more operations-friendly than many developer-first tools. It offers API power, but it also gives teams a cleaner frontend and no-code options, which makes it easier for non-technical users to work with.
Key features:
Pricing: Custom enterprise pricing (usually starts around $500/month based on volume).
Best for: Operations teams, accounting firms, mortgage teams, and businesses that want API power without a fully technical workflow.
| Pros | Cons |
| Strong UI for ops and business teams | High starting price for small teams or solo developers |
| Validation rules help reduce data errors | Less flexible outside financial or structured docs |
| Easy to train new document types | Black-box behavior limits deep tuning |
| Built-in email ingestion features | |
| Strong onboarding and support |
Picking a parsing API is not just about which one scores highest on accuracy tests. You also need to look at how it fits your actual stack, your data rules, and the kind of documents you handle every day.
Document parsing APIs are great at turning PDFs into structured Markdown or JSON. That is the reading part. The reasoning part usually comes later.
Say you extract a 40-page contract with Google Document AI or AWS Textract. Now you still need something to:
That is where LLMs come in. They can work on top of the parsed output and actually do something useful with it.
The annoying part is the architecture. Once you do this in a real app, you usually end up managing:
That gets messy fast. This is why unified gateways matter. LLMAPI describes itself as an OpenAI-compatible middleware layer that routes requests across multiple LLM providers from one endpoint. In practice, that means you can keep your parser separate, then send the extracted output into one LLM layer instead of wiring up OpenAI, Anthropic, Google, and others one by one.
A practical flow can look like this:
That setup helps because the parser and the reasoner do different jobs. The parser gives you cleaner input. The LLM gives you interpretation. Keeping those layers connected, but not tangled, usually makes the whole stack easier to manage.
Real documents are messy. That is the part people usually underestimate. Tables break across pages, phone scans come in sideways, and huge extraction outputs can blow up your downstream LLM costs.
Do not rely on plain OCR or basic text endpoints for invoices, receipts, or financial docs. Use document-specific endpoints that understand structure. AWS recommends AnalyzeExpense for invoices and receipts, and it returns line items plus summary fields instead of one flat text blob.
Azure’s prebuilt invoice model does the same kind of structured extraction for invoice totals, due dates, billing data, and line items. If your documents are especially ugly, LlamaParse and LandingAI both position their newer parsing stacks around layout-aware, visually grounded extraction for complex tables and cross-page structure.
Clean the image before you send it to the parser. That usually means:
OpenCV’s official docs cover thresholding and line-based preprocessing, which are common building blocks for this step. The better the input image, the better the parser usually performs.
Do not extract everything if you only need a few fields or sections. Use targeted extraction. AWS Textract has a Queries feature so you can ask for specific answers from a document instead of pulling everything.
LandingAI’s Extract API is also built around schema-driven extraction, where you define the fields you want and get back structured results. That keeps your downstream payload smaller and makes RAG or LLM reasoning cheaper.
The old way of pulling data from PDFs with endless rules and patches just does not hold up anymore. Strong document parsing tools can now pull structure and meaning out of messy files much more cleanly, whether you are working with invoices, contracts, forms, or long reports.
Still, extraction is only the first step. The real payoff starts when that raw text becomes something your product can reason over, summarize, classify, or use inside larger workflows. That is where a unified layer like LLM API can help. It offers an OpenAI-compatible API, multi-provider access through one gateway, performance monitoring, cost-aware analytics, secure key management, and per-model or provider breakdowns in one place.
Why use LLM API after document parsing?
If you want your app to do more than just read documents, LLM API is a natural next layer. It helps you connect parsed data to the models that can actually do something useful with it, without making the backend a mess.
OCR turns images of text into machine-readable text. IDP goes further and understands structure and meaning (for example, recognizing an “Invoice ID” based on context and layout, not just characters).
Often, yes. Modern document AI tools can read a lot of handwriting (even messy cursive) and can also handle things like checkboxes on scanned forms. Accuracy still depends on scan quality and handwriting style.
Think “two steps”:
It helps a lot. With routing and fallbacks, the summarization step can switch to a backup model if the primary one is slow or offline, so your document jobs are less likely to fail.
For sensitive data (PII, HIPAA), choose providers that offer strong enterprise terms like a BAA (when needed) and low/zero retention options. Also consider redacting sensitive fields before sending, and for maximum control, use self-hosted/container options when available.
AI-written content is everywhere now, and that makes trust a lot messier. A student essay, blog post, review, or support article can look totally normal while still be machine-made. That is why AI detection APIs matter more now. They help platforms check whether content looks human, AI-generated, or somewhere in between.
These tools do not “know” who wrote the text. They look for patterns in wording, structure, and predictability. Some only scan text. Others can also check code, images, or documents.
If you build products or manage content, it helps to know how these APIs actually work. They can be useful, but they are not magic. Below, we break down what they do well, where they fail, and what problems people keep running into.
Before the “how,” there is the simpler question: why bother at all? Most businesses do not add detection because they want to play content police. They add it because synthetic content can mess with the thing they actually care about — trust, quality, rankings, or ownership.
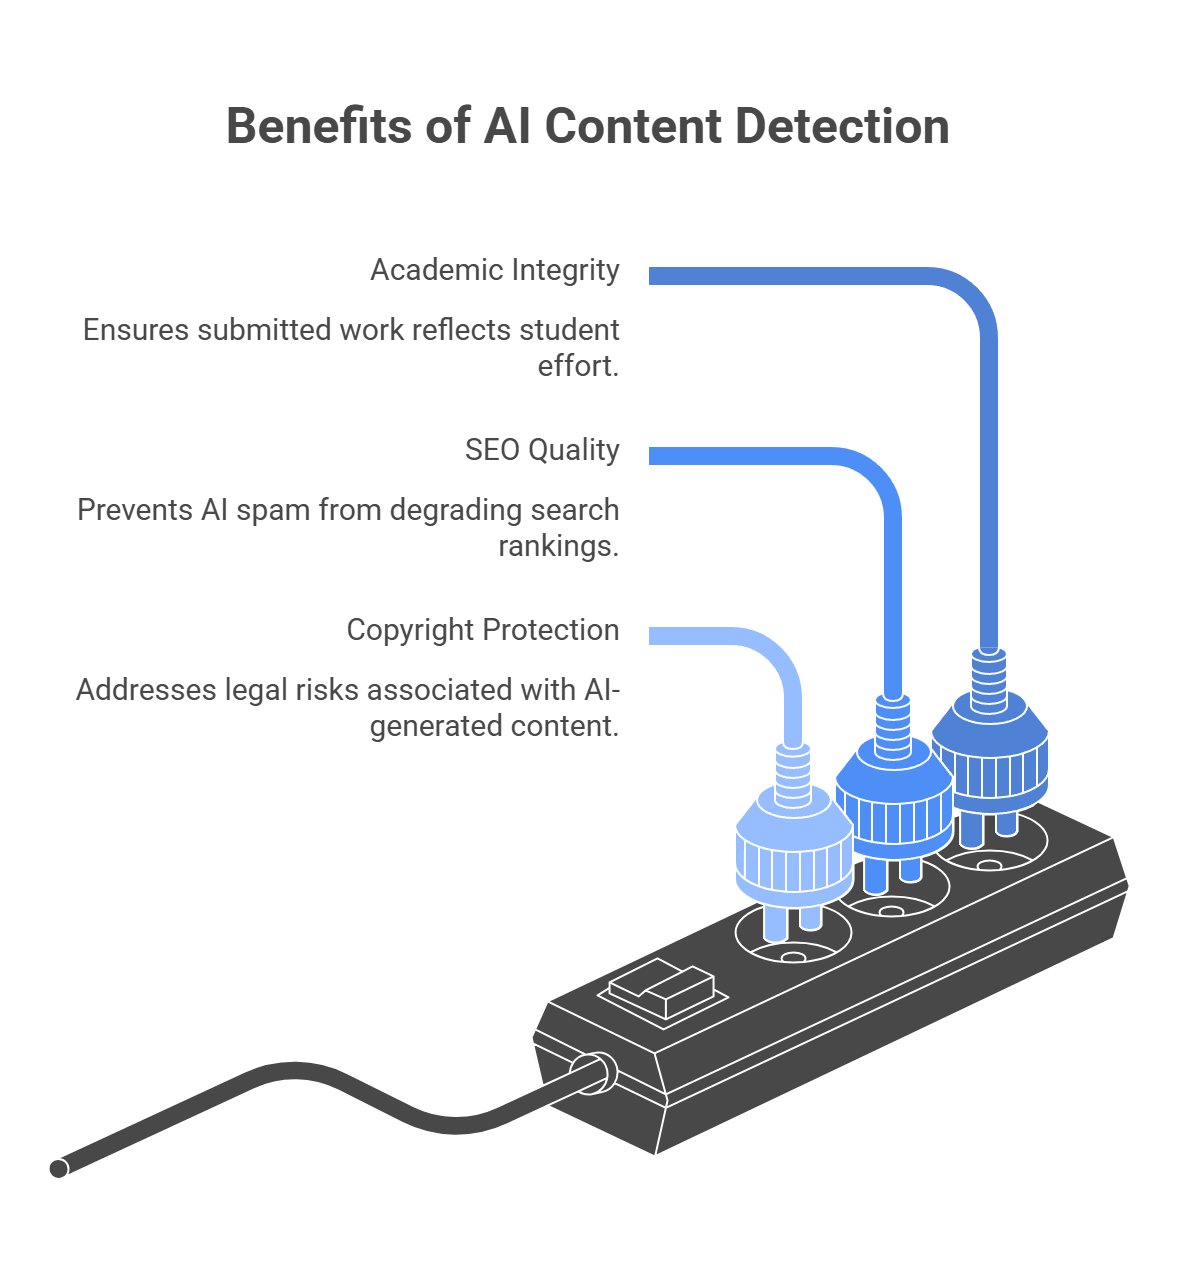
This is one of the clearest use cases. Schools, certification platforms, and assessment tools need to know whether submitted work reflects a student’s own effort. Turnitin openly frames AI detection as part of protecting academic integrity, but it also says the score should support human judgment, not replace it.
If your site depends on user submissions, freelance articles, or large content libraries, AI spam can pile up fast. Google does not ban AI content just because AI helped write it, but it does target scaled content abuse. Large amounts of low-value content made mainly to manipulate rankings. Detection helps publishers and platforms catch that kind of content before it drags quality down.
This part needs careful wording. It is not as simple as “AI text cannot be copyrighted” in every situation. The U.S. Copyright Office says copyright protection depends on human authorship. AI-generated material may be protectable only where a human contributed enough original expressive control, arrangement, or modification. So if a publisher or media company treats fully AI-generated copy like ordinary human-authored IP, that can create legal and ownership problems.
A lot of people imagine AI detectors checking some secret archive of everything ChatGPT ever wrote. That is not how it works. Most detectors do not know for sure where a piece of text came from. They look at signals and ask a narrower question: does this text statistically look more like machine output than human writing? OpenAI made this point pretty clearly when it shut down its own old classifier for low accuracy. Even OpenAI’s tool could mislabel human writing and struggled on short text, non-English text, and edited text.
This is the older and still very common approach.
Detectors look for patterns such as:
Two terms come up a lot here:
This method is useful, but it has a big weakness: it can confuse careful human writing with AI writing. That is one reason non-native English writers get flagged more often. Stanford researchers found that detectors were disproportionately likely to classify TOEFL essays by non-native English speakers as AI-generated, partly because these systems lean on predictability metrics like perplexity.
A lot of commercial detectors do more than just measure perplexity and burstiness. They also use trained classifiers.
That means the detector is trained on many examples of human-written and AI-written text, then learns patterns that help it guess which side a new passage looks more like. OpenAI described its retired classifier this way: a model trained to distinguish responses written by AI from those written by humans.
This is usually more complex than a simple “low perplexity = AI” rule. The model may combine:
But the core limitation stays the same: it is still a probability judgment, not proof.
Because models keep getting better at sounding human, the industry has also pushed toward watermarking and provenance systems.
This works differently. Instead of guessing from style alone, the generation system embeds a detectable signal during generation. Google DeepMind’s SynthID is the clearest official example. It subtly adjusts token selection so the output carries a watermark that specialized detectors can look for later.
That sounds much stronger, but there are two important caveats:
Google DeepMind explicitly says SynthID text watermarking is less effective on factual prompts and other cases where there is little room to vary token choice without changing meaning. So this is not a magic “100% certainty” button. It is useful, but limited.
This is the part readers usually care about most. Even with all this math, detection is still shaky in real life.
Common failure points:
OpenAI’s discontinued classifier page openly listed several of these limits. Recent research also keeps pointing out that many detectors still produce both false positives and false negatives, especially across diverse student populations.
So the short version is:
That is why smart teams use AI detection as a risk signal, not a final verdict. The tool can help you decide what needs review. It should not be the only thing standing between a user and an accusation.
This choice really comes down to one thing: how bad is a false positive in your product? If you run a university tool, wrongly accusing a student can do real damage. If you run a publisher workflow or a content marketplace, a stricter filter may be easier to justify. That is why the “best” detector is not universal. It depends on whether you care more about protecting human writers or catching as much AI text as possible. Stanford researchers, for example, have warned that detectors can be unfair to non-native English writers, which is exactly why this tradeoff matters.
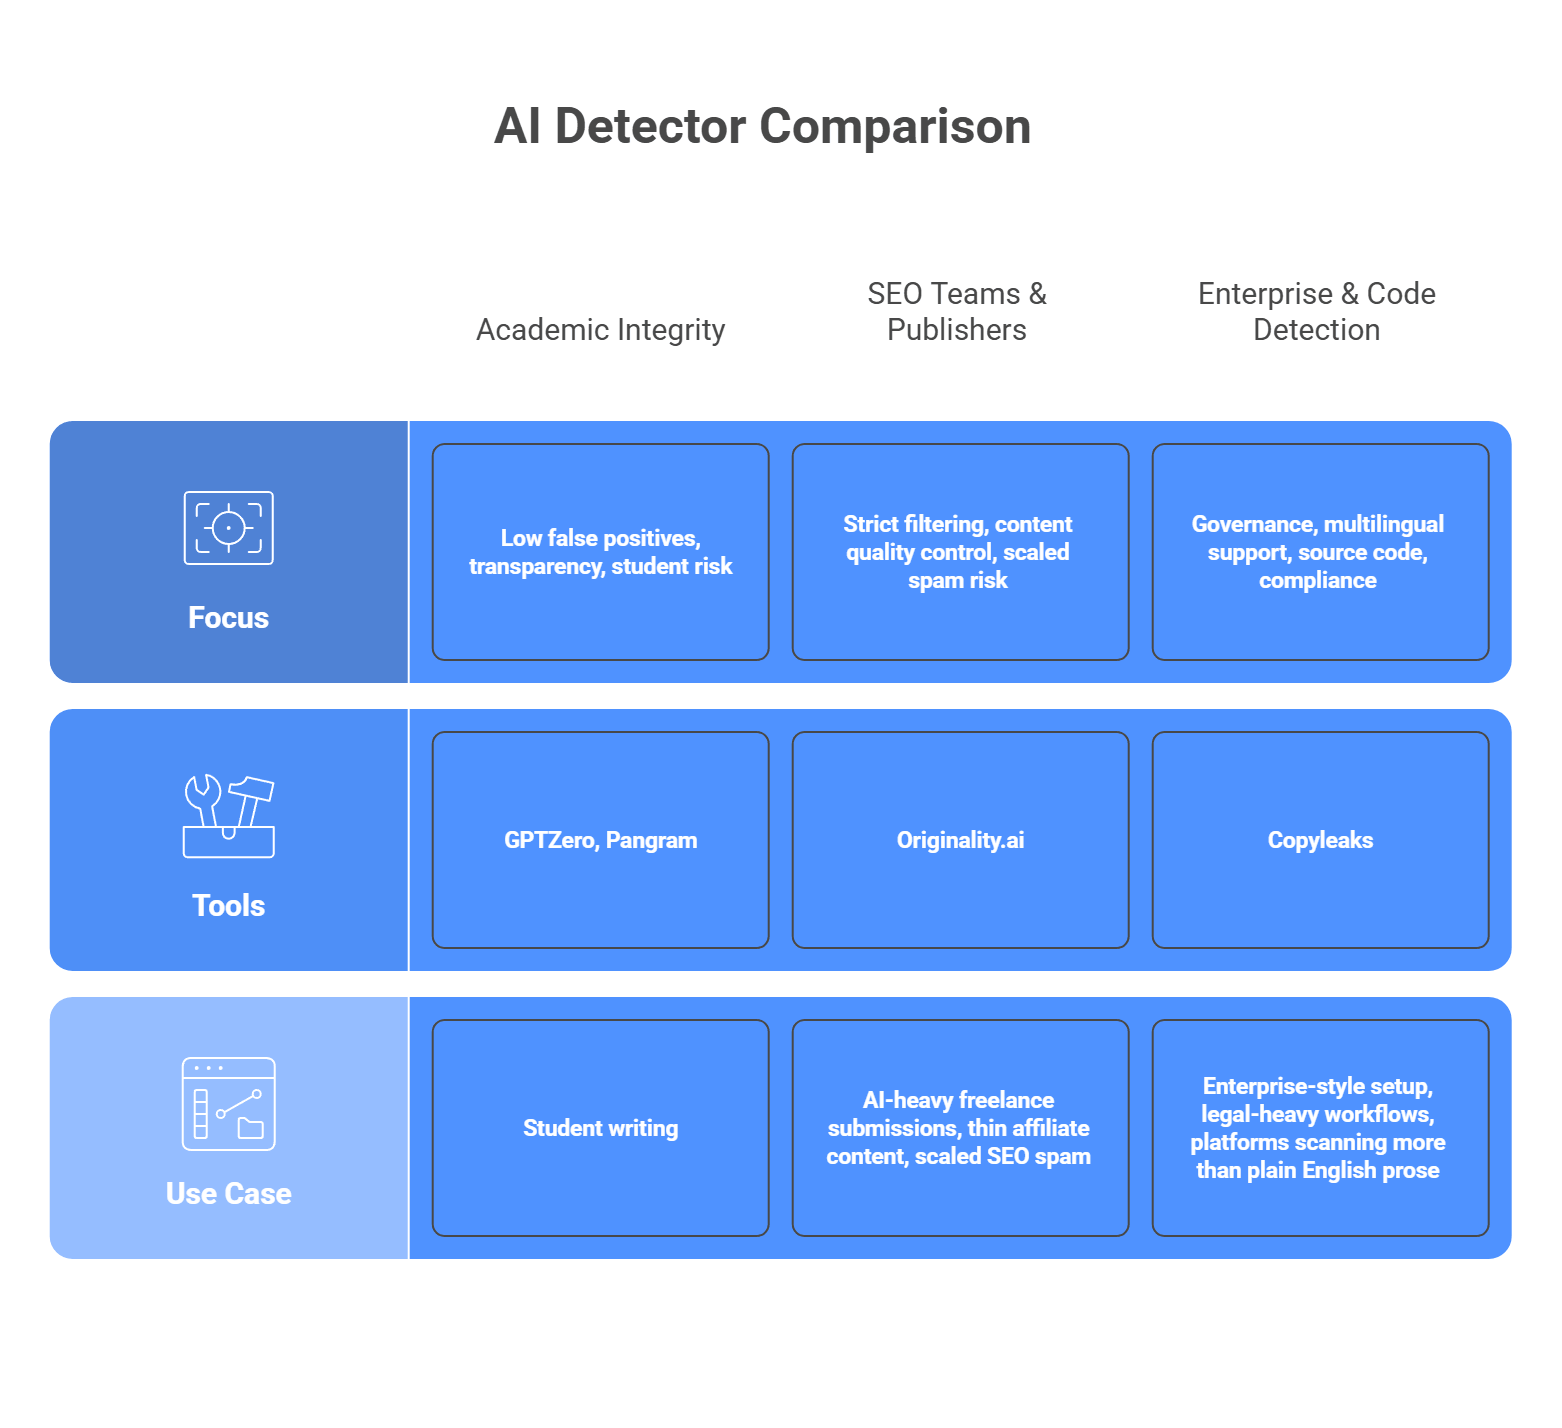
No detector is perfect, and they are not built for the same jobs. Some tools lean toward caution and transparency. Others lean toward stricter filtering. A few are built more for enterprise workflows, multilingual content, or source code scanning. So the smarter move is to match the tool to the kind of mistake you can tolerate.
Focus: low false positives, transparency, student risk
If you are dealing with student writing, look first at GPTZero or Pangram. GPTZero is built heavily around education and writing-process review, with sentence-level analysis and classroom-oriented workflows. Pangram puts a lot of emphasis on low false-positive rates and protecting human writers, which makes it attractive when accusations need to be handled carefully. These are better fits when you need the detector to support review, not bulldoze over edge cases.
Focus: strict filtering, content quality control, scaled spam risk
If your problem is AI-heavy freelance submissions, thin affiliate content, or scaled SEO spam, Originality.ai is the more natural fit. Its product is aimed directly at publishers, agencies, and content managers who want to screen aggressively. That stricter posture can be useful in content operations where weak AI copy is the main threat, even if it means some edited human text may need closer review.
Focus: governance, multilingual support, source code, compliance
If you need a more enterprise-style setup, Copyleaks is the strongest option in this group. It positions itself around SOC 2 and GDPR compliance, supports AI detection in 30+ languages, and also offers AI source-code detection. That makes it a better match for larger organizations, legal-heavy workflows, or platforms that need to scan more than plain English prose.
So the short version looks like this:
That is usually the cleanest way to choose. Start with the kind of false positive you can live with, then pick the tool that matches that risk.
This is where AI detection gets messy in real life. If you read forums like r/academia or r/freelanceWriters, the complaints are not abstract. People get flagged when they did write the work. People use a little AI help and feel punished for it. And developers end up stuck in the middle.
This one is serious. Non-native English writers get flagged more often because their writing can look more formal, structured, and predictable to a detector. Stanford researchers found that detectors frequently misclassified non-native English writing as AI-generated, and reporting from The Markup found similar patterns across several tools.
The fix: Do not use the detector score as an automatic ban or final verdict. Treat it like a warning light, not a conviction.
A better workflow looks like this:
That approach is safer because even OpenAI retired its own AI classifier due to low accuracy.
This is another common complaint. Research papers, technical docs, and formal academic writing often sound structured and predictable on purpose. That can make them look machine-written even when they are not. The same reliability problems that hurt ESL writers also show up here: detectors are weak when they lean too hard on predictability and writing pattern signals.
The fix: Raise your threshold for action if your platform hosts academic, legal, or technical writing. Do not trigger consequences from a middling score.
A practical setup:
The exact threshold depends on your platform, but the main idea is simple: stricter review, not stricter punishment.
A user writes the draft, then uses Grammarly to clean up punctuation. Or they use AI to brainstorm an outline, then write the piece themselves. Detectors may still flag that text. From the user’s point of view, that feels like getting punished for using editing help, not cheating. That gray zone keeps coming up in academic communities because the line between assistance and generation is blurry.
The fix: Write your policy before you deploy the detector.
Be clear about:
If your platform does not define those lines, the detector will create confusion instead of trust. That is the real problem in a lot of these communities: not just the score, but the lack of a clear rule behind it.
People actively try to dodge AI detectors. One common method is evasion prompting. The user asks the model to write in a simpler voice, vary sentence length, add small imperfections, or sound less polished. The goal is to make the text look less predictable to pattern-based detectors. Turnitin now explicitly talks about “AI bypassers” and “humanizer” tools built for this purpose.
There is also a growing market of AI humanizer tools. These tools rewrite model output so it looks more human on the surface. That is why detection vendors keep updating their systems. Turnitin says its current model can detect likely use of AI bypasser tools in some supported cases, which shows how central this problem has become.
What this means for developers:
That is why model maintenance matters. Copyleaks and Turnitin both now market their products around detecting paraphrased or bypassed AI content, which tells you this is now a normal part of the detection battle.
AI-generated content detection APIs are an important part of modern software infrastructure. They help platforms spot large volumes of synthetic text at scale. But if your product also creates AI content, detection is only half the picture. The generative side needs to stay just as organized, stable, and easy to manage.
That is where LLMAPI fits in naturally. It gives you one OpenAI-compatible API and a single endpoint for working across many models, so you do not have to juggle separate integrations for every provider. It also adds routing, failover, cost controls, unified billing, team keys, and usage visibility in one layer, which can make the generative side of your stack much easier to scale.
Why use LLMAPI for generative features?
If you want to keep your detection layer strong without letting the generative side turn into backend chaos, LLMAPI is a smart layer to add. It helps you keep the architecture cleaner, more flexible, and easier to maintain as your AI product grows.
No. They’re statistical signals. Perplexity measures how predictable the word choices are, and burstiness looks at how much sentence length/structure varies. Many AI outputs score “too smooth” on these metrics compared to messy human writing, so detectors treat that as a risk signal, not a verdict.
False positives happen when the writing is naturally structured and consistent. Common examples: technical docs, legal text, formal essays, and some non-native English writing. Those styles can look “model-like” even when a human wrote them.
LLMAPI can keep the generation side simple: one endpoint, one key, access to multiple major models. You generate text through llmapi.ai, then send the output to your separate quality/detection/moderation tool.
It can help. With routing and fallbacks, requests can move to a backup model when the primary one is slow or down, so your pipeline is less likely to stall before it reaches your scanning step.
Some can, but you need image-focused (multimodal) detection. These tools look for visual artifacts and other signals (odd blending, inconsistent details, sometimes watermarks), which is different from text-only detection.
Machine translation used to get the point across, but the writing often felt awkward. Tone slipped, idioms sounded strange, and technical text needed cleanup.
LLMs changed that. Translation tools now focus much more on context and meaning, not just word swaps. Smartling and DeepL both now frame translation around stronger context handling in longer text and more adaptive workflows.
So what does that mean for you? If you build a multilingual app, manage localization, or need translated content that still sounds natural, the question is no longer just “Can AI translate this?” It is more like: Which model should handle it, when do you need human review, and how do you get output that actually sounds right for the audience? Below, we’ll break down the current AI translation landscape, the strongest model options, and how to get much better multilingual results with LLMs.
The big shift is simple: older translation systems mostly worked segment by segment. LLMs work with more context, more control, and more output flexibility. Traditional machine translation, including classic NMT setups, was built around paired sentence data and strong sentence-level translation. Google Cloud still separates NMT, custom models, glossaries, and newer Translation LLM workflows in its translation stack.
That difference matters because LLMs are better at problems translation teams deal with every day:
One important reality check: bigger context does not automatically mean perfect consistency. Google’s own developer forum has posts from users who say long-context performance can degrade in real use, so teams still need testing and QA instead of trusting the token limit on the label.
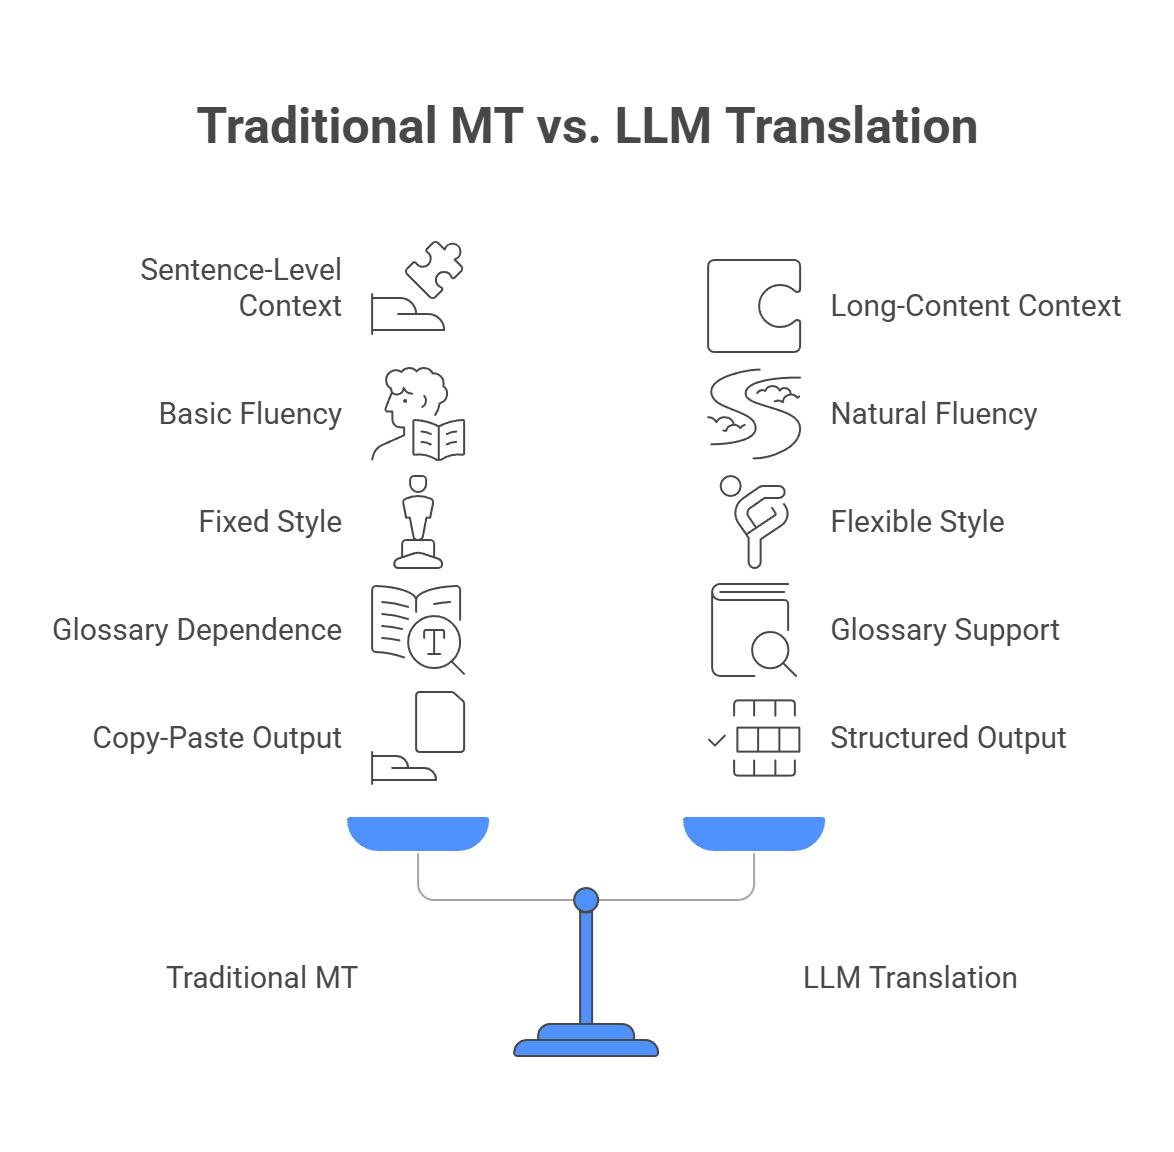
So no, LLMs did not “replace translation problems.” They changed the kind of control you have. That is the real upgrade: better fluency, better context handling, better style control, and better fit for real product workflows.
There is no single “best” model for every translation job. The right pick depends on what you translate: UI strings, legal docs, PDFs, product copy, low-resource languages, or bulk content at scale.
A cleaner way to choose is this:
Anthropic explicitly positions Claude as strong in multilingual tasks, including zero-shot work across languages. That makes it a good fit for teams that care about how the translation sounds, not just whether the meaning is technically correct.
For developers, Claude is especially useful when you need to load a long style guide, glossary, or product context before translation. Anthropic also supports prompt caching, which can help when you reuse the same large instructions across many translation requests.
For localization teams and content owners, Claude is a strong option for:
In practice, Claude makes the most sense when your biggest question is: Will this still sound human after translation?
OpenAI is a very practical choice when translated text has to fit into a product pipeline, not just a document. Its latest API models support multilingual input and structured outputs, and OpenAI’s Structured Outputs feature is specifically built to keep responses aligned to a JSON schema.
That matters a lot for developers. If you translate:
Then structure matters almost as much as language quality. OpenAI is a strong fit when the translation has to stay machine-readable and predictable. GPT-4.1 also offers a 1M-token context window and is positioned as strong at instruction following and tool calling.
For product and localization teams, OpenAI is usually the safer pick when you need one model that handles many languages and many content types without too much special tuning.
Gemini stands out when translation is not just plain text. Google’s docs say Gemini can process PDFs with native vision, handle up to 1000 PDF pages in document workflows, and work with long context at 1M+ tokens.
That makes it especially useful for:
For developers, Gemini is attractive when the translation task includes layout-aware or file-aware understanding, not just sentence conversion. If your source content includes charts, tables, screenshots, or visual references, Gemini has a real edge because it can interpret more than plain text.
For business users, Gemini is a strong option when the question is: Can the model understand the whole document, not just the text pulled out of it?
If cost matters a lot, or your product serves Chinese and nearby language markets heavily, Qwen and DeepSeek are worth serious attention.
Qwen’s official materials say the model family supports 119 languages in Qwen3 and expands to 201 languages and dialects in Qwen3.5. Qwen also released a translation-focused model, Qwen-MT, and positions it directly around translation quality and speed.
DeepSeek’s value is simpler: price. Its official API pricing page shows low per-token costs, which makes it attractive for high-volume translation pipelines where cost per million tokens matters.
For developers, these models make sense when you need:
For teams that ship lots of content every day, the question is often not “Which model is perfect?” but “Which model is good enough at a price we can scale?” That is where Qwen and DeepSeek become much more interesting.
DeepL is still not “just another LLM.” It remains a translation-focused platform, and its newer generation models are designed specifically for translation quality. DeepL says its next-gen model improved translation quality over its older classic model, and its developer docs now support custom instructions for tone, terminology, formatting, and domain-specific guidance.
For developers, that means DeepL is strong when you need:
For localization managers and non-technical teams, DeepL is often easier to justify when the task is straightforward professional translation and you want fewer moving parts. DeepL also supports document translation with layout preservation across major file formats.
Meta’s NLLB-200 project was built specifically to support 200 languages, including around 150 low-resource languages. That makes it important in cases where mainstream commercial APIs may not be the strongest fit.
For developers, NLLB is most relevant when:
For product teams, this is less about fancy output and more about reach. If your market includes languages many big tools handle weakly or inconsistently, NLLB deserves a look.
A plain prompt like “Translate this to French” can work for simple text. For anything customer-facing, technical, or brand-sensitive, that is usually not enough. Better translations come from better setup.
This is the fastest quality upgrade. Do not ask for a generic translation. Tell the model the role, audience, tone, and goal. For example:
This matters because modern LLM translation workflows are increasingly built around prompt control, not just raw language conversion. Smartling’s LLM translation docs, for example, explicitly position LLM translation around prompt-guided behavior and glossary-aware output.
A better prompt looks like this:
You are an expert bilingual copywriter for Gen-Z fashion brands. Translate this product description from English to Brazilian Portuguese. Keep it upbeat, trendy, and conversational.
That gives the model something much closer to a real translation brief.
This is where many teams mess up. If your brand always translates “Dashboard” one specific way, or your legal team uses fixed wording, pass that in. Do not hope the model guesses right every time.
Glossaries are still a core part of production translation. Smartling supports glossary term insertion for LLM translation, and DeepL’s API also supports glossaries directly in translation workflows. For developers, this usually means:
For localization teams, the point is simple: the more important the terminology, the less you should leave to chance. Smartling also describes glossaries as a way to preserve brand terminology across translations.
One-shot translation is fine for rough drafts. For production work, a review step helps a lot. A strong workflow looks like this:
You do not always need three separate models, but you should separate the tasks. One pass translates. Another checks whether anything was dropped, mistranslated, or made too literal.
This is especially useful for:
This is critical for developers. If you translate app files, JSON, XML, HTML, or placeholder-based strings, you need hard rules. For example:
This is where structured outputs help. OpenAI’s Structured Outputs feature is designed to keep responses aligned to a JSON schema, which is useful when translated content has to stay machine-readable.
A much safer prompt looks like this:
Translate the values in this JSON file to Spanish. Do not translate the keys. Do not translate placeholders such as {username}. Preserve the JSON structure exactly.
That one instruction can save a lot of cleanup later.
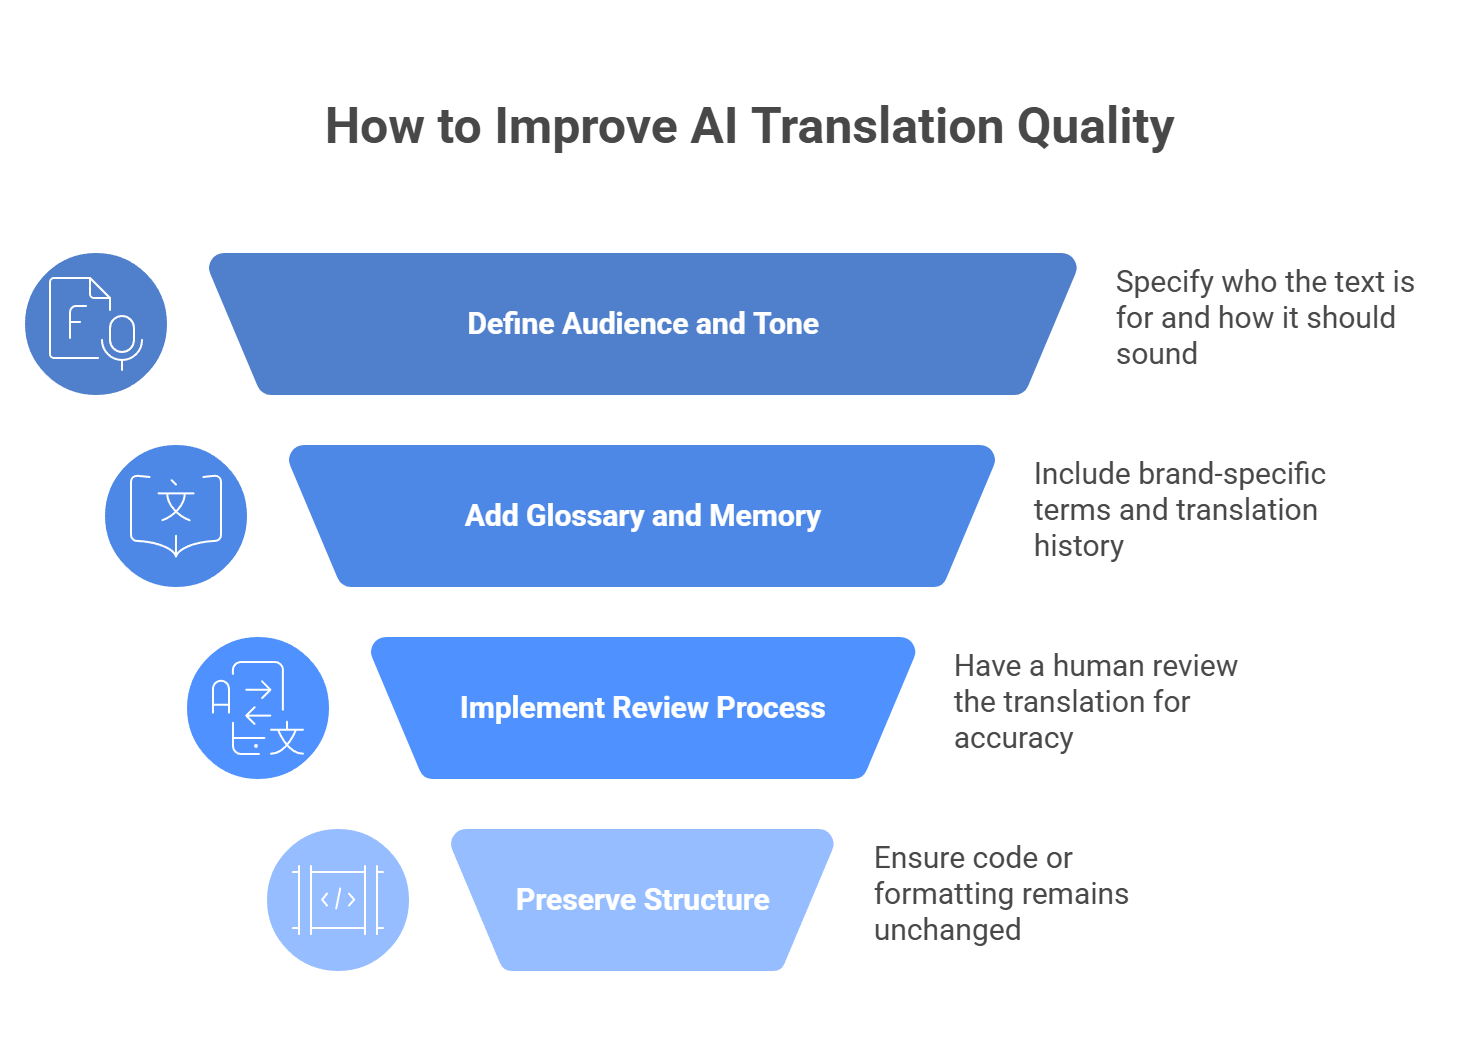
If you want better translation quality, do four things:
That is usually the difference between “good enough demo output” and something you can actually ship.
LLMs are good at making translations sound smooth. That is exactly why they still need human review in important cases. The problem is not always obvious broken output. The harder problem is plausible error, a sentence sounds natural, but one term, number, or legal nuance is wrong. Smartling’s docs explicitly warn that LLMs can produce hallucinations in translation and recommend keeping a human in the loop to validate and edit results.
That changes the human role. Instead of translating everything from scratch, people more often work as:
This matters most for:
And this is not just best-practice talk. Phrase notes that under the 2025 ACA language access rules, machine-translated healthcare content must be reviewed by a qualified human translator. So the smart model is not AI or human. It is AI plus human review where risk is high. A practical rule:
That is the setup that usually gives teams the best mix of speed, scale, and actual trust.
LLM-based translation has changed global communication. Instead of matching words one by one, modern models can preserve tone, context, and nuance more naturally. That gives teams a better way to localize marketing copy, product content, documentation, and user experiences without sounding robotic.
The challenge is that one model will not be the best fit for every task. A model that works well for brand messaging may not be ideal for technical content or multimodal files. That is why a flexible translation pipeline matters. It lets you choose the right model for each job instead of relying on one provider for everything.
This is where LLMAPI fits in naturally. It gives you one OpenAI-compatible API with access to 200+ models, so you can route translation workloads more flexibly, manage providers in one place, and switch models without rebuilding your integration.
Why use LLMAPI for translation workflows?
If you want to make your product, app, or content strategy more global without making your infrastructure more complicated, LLMAPI is a smart layer to add. It gives you the flexibility to choose the right model for each translation task while keeping the integration simple underneath.
For most professional work, yes. Traditional tools are great for fast, literal sentence-by-sentence translation. LLMs tend to do better with full documents because they keep context, maintain tone, and can follow style instructions (like “make it more formal”).
Yes. You can tell the model to translate only text values and keep keys, variables, and syntax unchanged. This keeps your structured files valid for your app.
Different models are strong in different languages and styles. LLMAPI lets you access multiple providers through one API, so you can route translations by target language or content type and get more consistent quality.
Outages happen. If you rely on one provider, your localization flow can break. With LLMAPI, you can use load balancing and failover to route requests to a backup model and keep translations running.
Use a simple glossary in your prompt. Add rules like “Never translate ‘CloudSync’” and “Translate ‘Dashboard’ as ‘Painel’.” This keeps brand terms and key jargon consistent.
Want to give your app an AI layer without building backend logic from scratch? Zapier makes that much easier.
You can use it to summarize support tickets, draft emails, sort feedback, and connect AI to the tools your team already uses. So instead of building everything yourself, you turn Zapier into the bridge between your app, your workflow, and the AI.
Below, let’s go step by step through how to make that work.
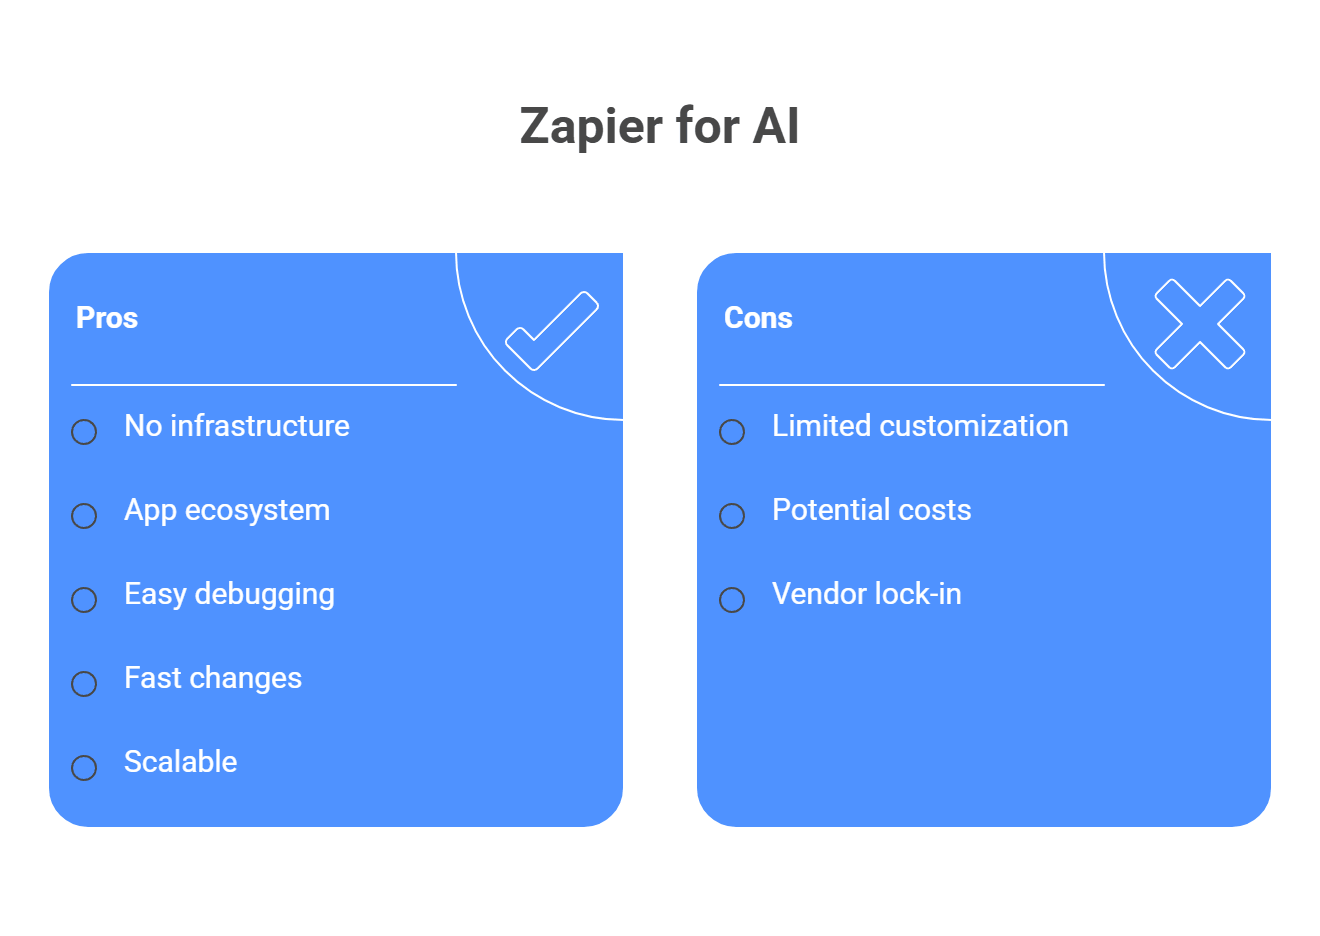
If the goal is to get AI working fast, Zapier has a pretty obvious advantage: you can wire things together without building backend infrastructure first. No server to maintain, no queue system to set up, no separate admin panel just to see what happened.
A few reasons teams like it:
So why use Zapier instead of hardcoding every API call yourself? Usually because it gets you from idea to working automation much faster, makes debugging less painful, and gives you a cleaner way to connect AI to the rest of your stack.
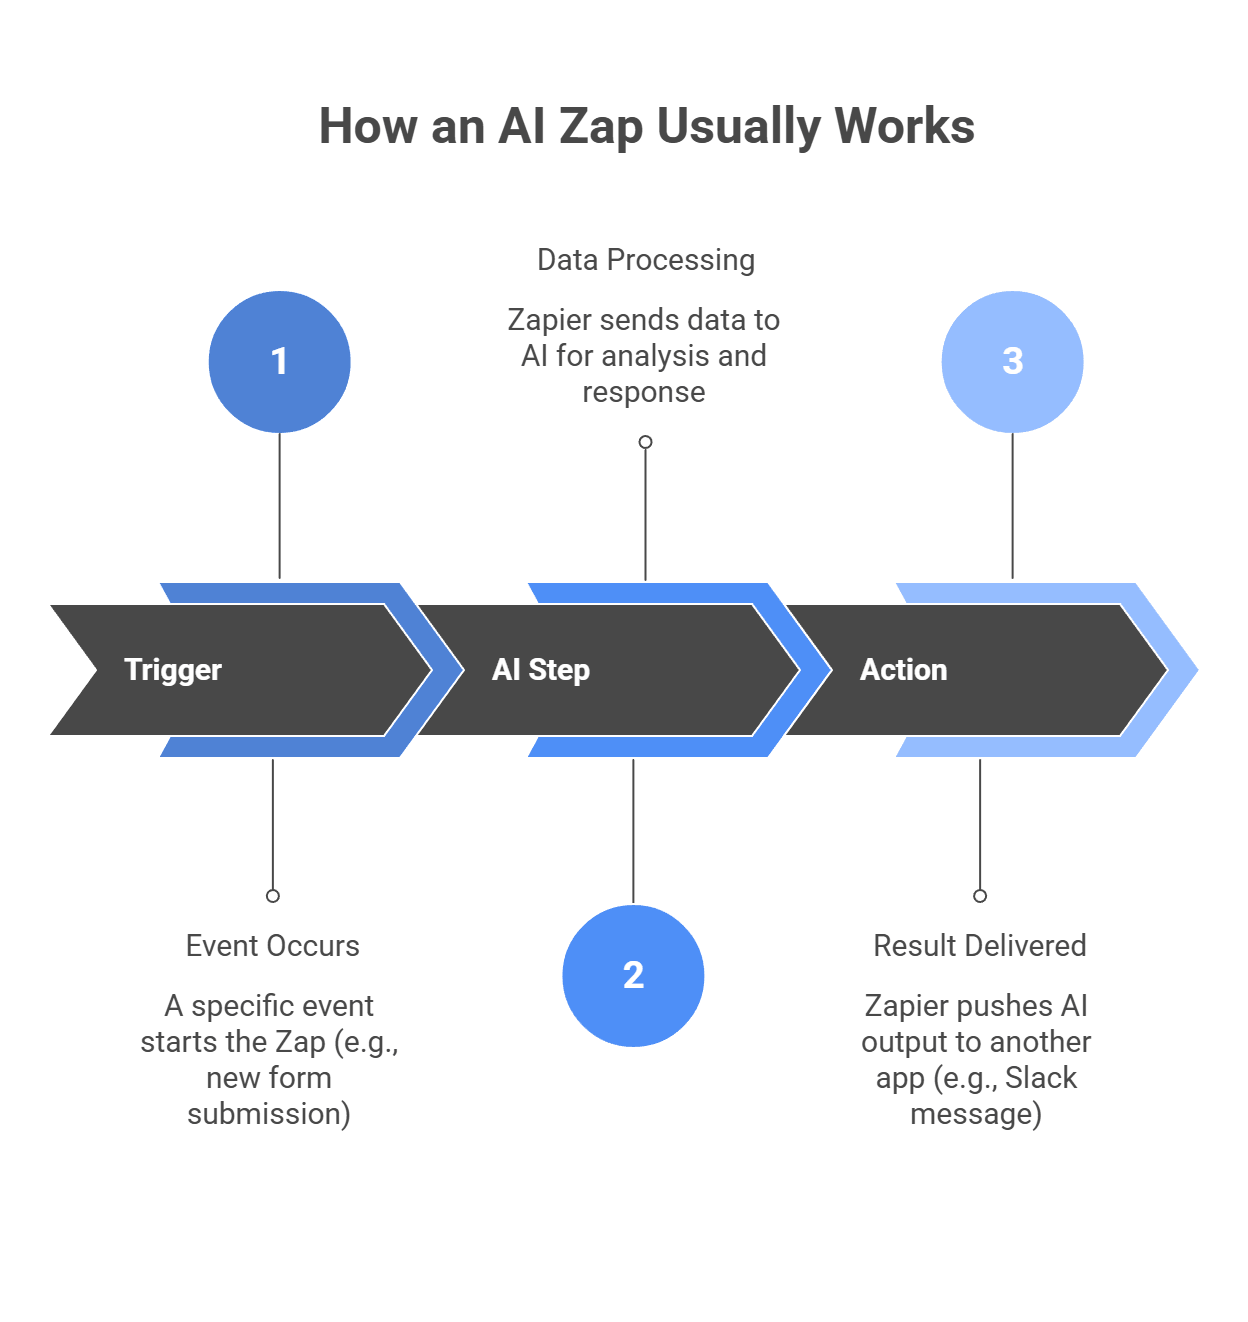
Before you build anything, picture the flow first. Most AI Zaps follow a simple pattern: something happens, AI does the thinking, then Zapier sends the result somewhere useful. That is basically the whole setup.
This is the “when.” A new form gets submitted. A new row appears in Google Sheets. A support ticket comes in. Zapier defines a Zap as an automated workflow built from a trigger plus one or more actions.
This is the “brain” part. Zapier takes the data from the trigger, turns it into input for an AI step, and sends it off for processing. That can mean summarizing text, classifying feedback, drafting a reply, or pulling out key details. Zapier’s AI tooling is built around exactly these kinds of no-code AI automation steps, and it connects with thousands of apps plus hundreds of AI tools.
This is the “then.” Once the AI response comes back, Zapier pushes it somewhere: Slack, Gmail, HubSpot, a spreadsheet, a CRM, wherever the workflow needs it. That is what makes the whole thing useful. The AI does not just generate text for fun, it moves the next step forward. Zapier’s help docs describe actions as the events a Zap performs after the trigger fires.
So the real architecture is pretty simple:
Trigger → AI step → Action
And honestly, that is why Zapier works so well for AI workflows. You do not need to build a whole backend just to move data from one tool, through an AI model, into another tool.
For this guide, the most flexible setup is Webhooks by Zapier. Zapier does have native AI integrations, but the webhook route gives you more freedom. You can connect to almost any AI API or unified gateway without waiting for Zapier to add or update a built-in app. That is also why Zapier community answers often point people to Custom Request when the normal app step is too limiting.
Before you click around in Zapier, define the flow in one sentence.
For example:
When a customer sends a support ticket, summarize it with AI and post a suggested reply in Slack.
That gives you three clear pieces:
This sounds simple, but it matters. A lot of messy Zaps happen because people start building before they know what the input and output should look like.
In Zapier:
When you test a trigger, Zapier tries to pull recent records from the connected app so you can use real sample data while building the rest of the Zap. That is the official behavior, and it helps a lot because you are not guessing at field names.
Now add the AI step.
This option is useful because it gives you full control over the request body and headers, which is exactly what you want for AI APIs. Community posts also call out Custom Request as the better option when you need to control the JSON structure yourself.
Then set it up like this:
In the Data or request body area, send valid JSON. A simple structure looks like this:
{
  "model": "gpt-4o",
  "messages": [
    {
      "role": "system",
      "content": "You are a helpful customer support assistant. Summarize the following ticket and suggest a polite response."
    },
    {
      "role": "user",
      "content": "Ticket from Customer: {Insert Trigger Data Here}"
    }
  ]
}
Instead of typing the ticket text manually, use Zapier’s variable picker to insert the real field from the trigger step.
Then add headers such as:
One practical heads-up from Zapier community threads: header behavior and JSON formatting are common places where webhook tests go wrong, especially when the receiving API expects a very specific body format.
Click Continue, then Test step.
Zapier will send the mapped request to your AI API. If it works, you should see the raw response in the test result.
What are you looking for? Usually the actual answer will live inside a nested field such as:
This part matters because the next step will need the exact field that contains the generated text.
Now add the final action.
For example:
In the message body, insert the AI output field from the webhook step. This is where the earlier test pays off, because now you know which field actually holds the result.
Then run Test step again and make sure the message shows up the way you want.
Once the test looks good, publish the Zap.
After that, watch Zap History for the first few days. Zapier’s help docs describe Zap History as the place where you can review Zap runs and task usage, and community troubleshooting posts also treat it as the first place to check when a workflow starts acting weird.
That part is worth taking seriously. A workflow can pass one clean test, then fail later because:
Zapier makes AI workflows much easier, but the same issues come up again and again in forum threads: the request takes too long, the JSON breaks, the model gets rate-limited, or one messy field ruins the whole run. Zapier community posts also confirm that 30 seconds is a hard timeout for a single request, and it cannot be extended.
Here are the ones to watch most:
A good rule here is simple: if the request is too slow, shorten it or make it async. If the payload is too messy, clean it before it leaves Zapier. And if volume starts to grow, treat rate limits as a real part of the design, not a surprise later.
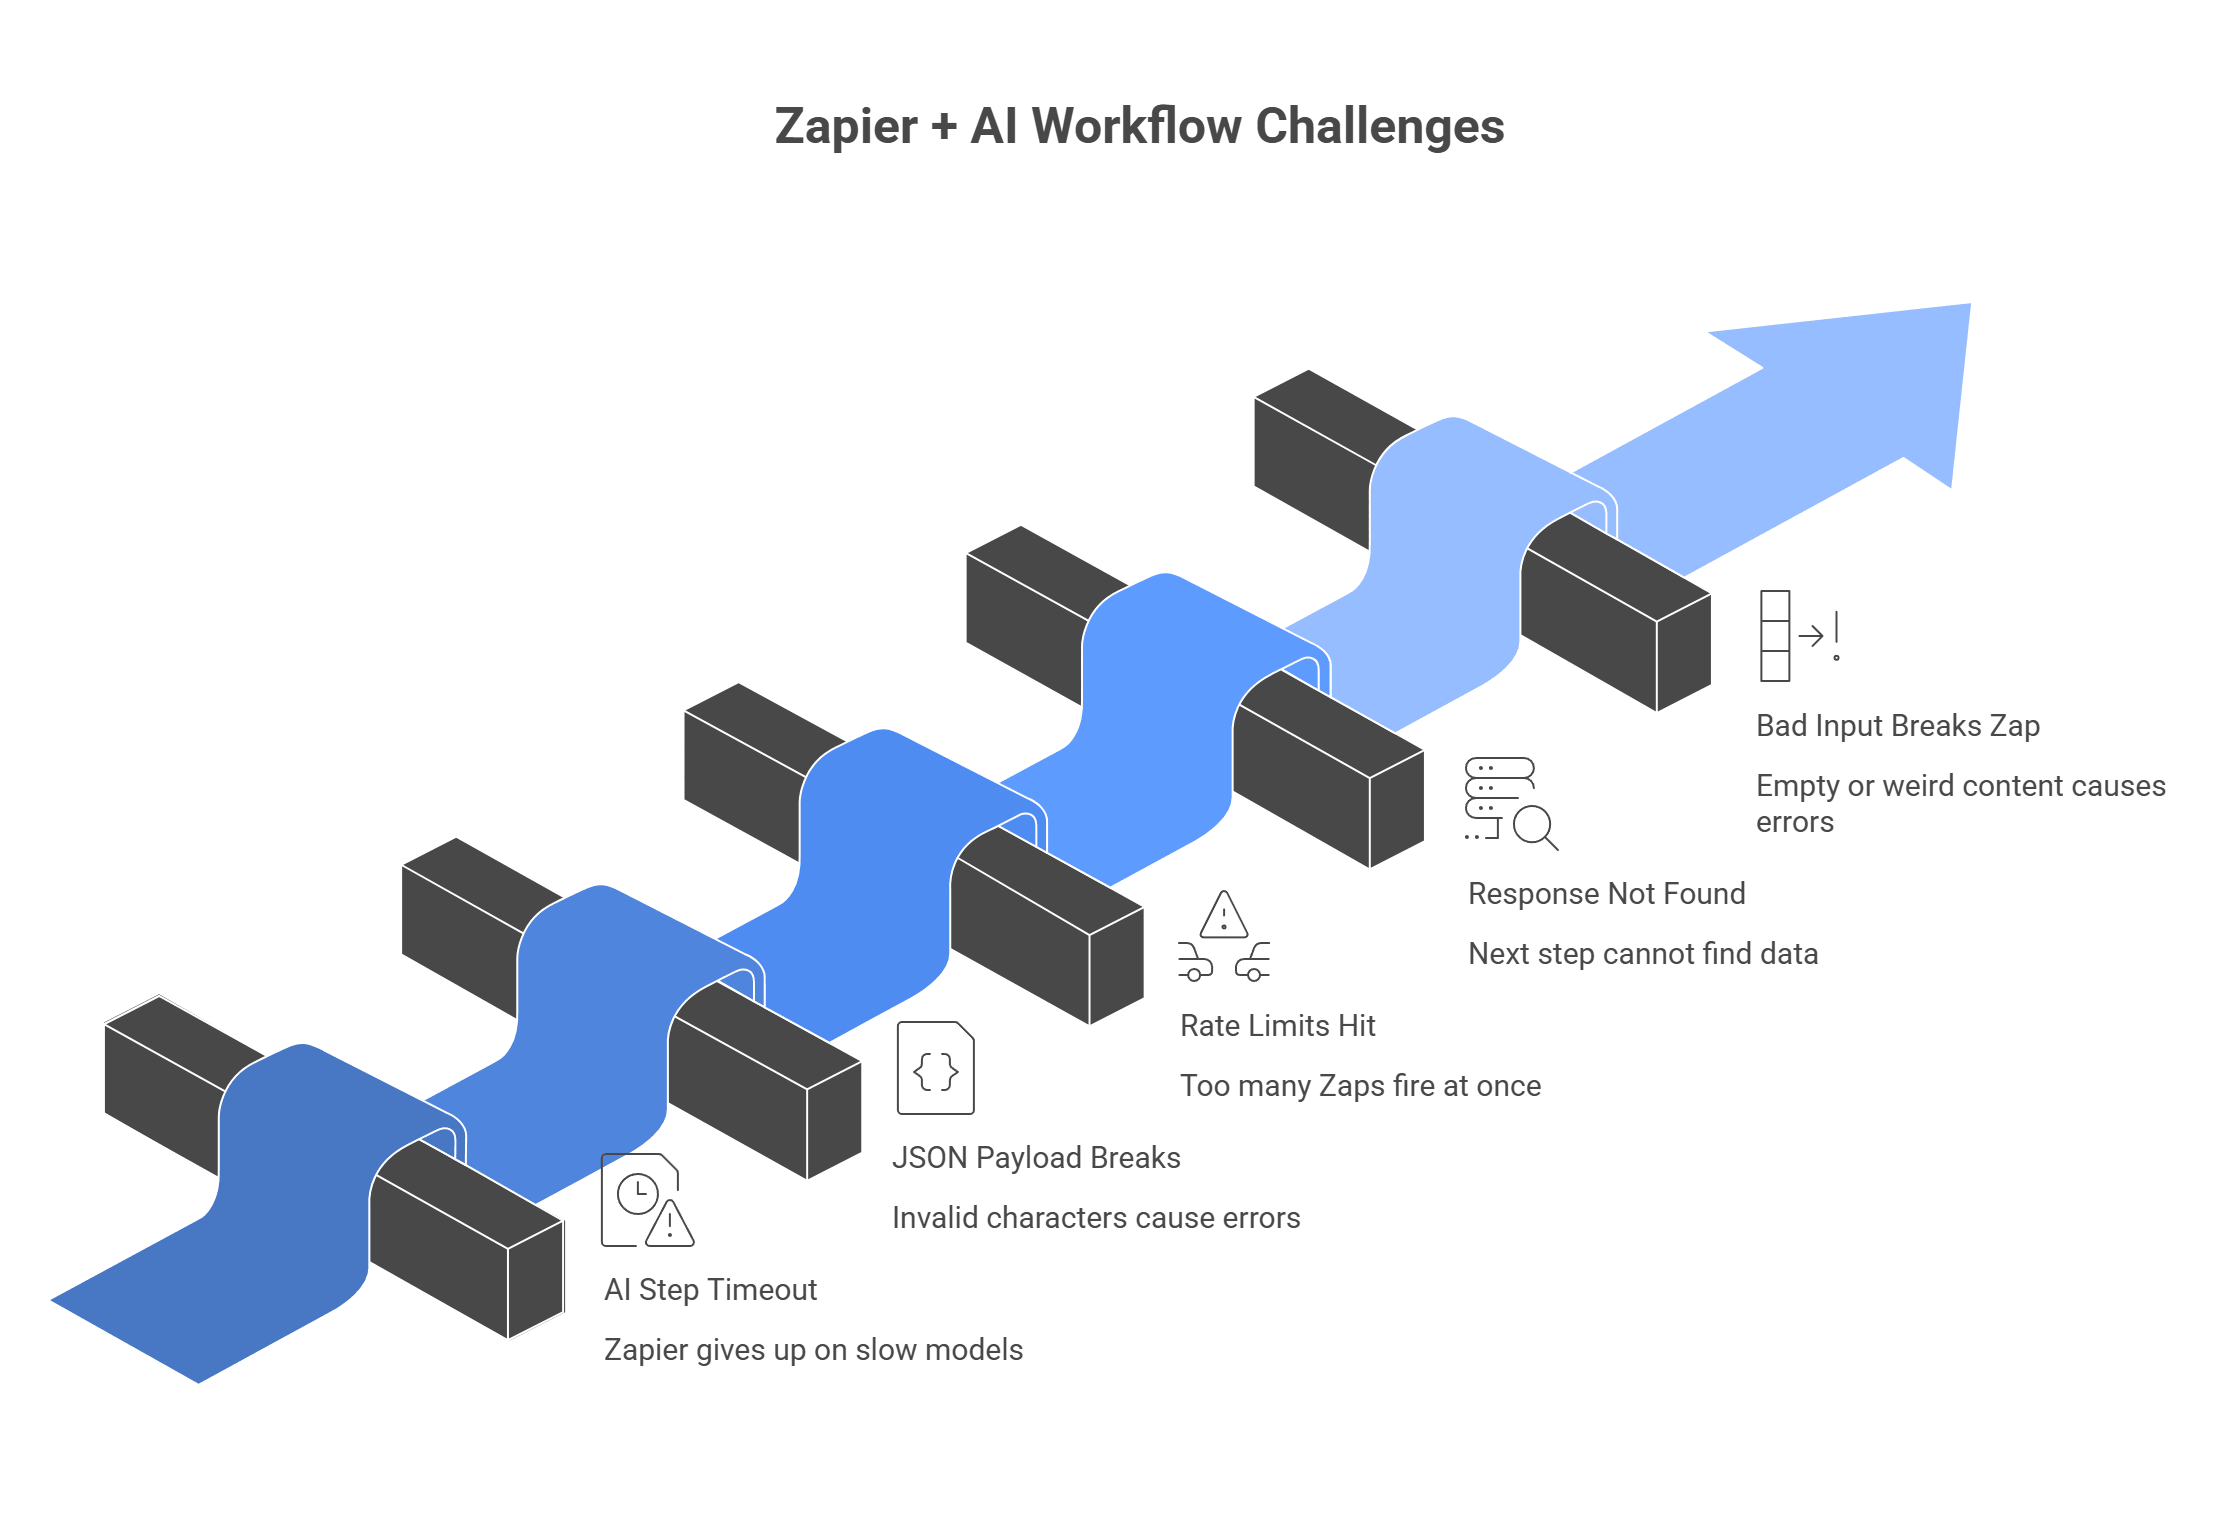
Zapier makes AI automation much more accessible. With triggers, webhooks, and actions, non-technical teams can build useful workflows without needing fully custom software. That opens the door for founders, marketers, and operations teams to create practical AI tools faster and with less friction.
The problem is that building the automation is only one part of it. Keeping it reliable is the harder part. If your workflow depends on just one provider, rate limits, outages, or slow responses can break important automations at the worst time.
That is where llmapi.ai fits naturally. It gives you one OpenAI-compatible endpoint with access to top models across providers, so your Zapier webhook setup stays simpler underneath. It also helps teams stay more flexible with routing, fallback options, and easier model switching when performance or availability changes.
Why use LLMAPI?
If you want your Zapier AI automations to feel easier to manage and less fragile over time, llmapi.ai is a natural layer to add. It helps you keep workflows moving without turning every provider issue into your problem.
Usually, yes. The free tier is limited, and most AI workflows need multi-step Zaps (Trigger + Formatter + Webhook + Action). Webhooks and other premium apps are commonly tied to paid plans.
If you use a unified gateway like LLMAPI, you keep the same Webhook URL and headers. You just change the model value in your JSON payload (for example, “gpt-4o” → “claude-3-5-sonnet”) and run a test.
Zapier has strong security/compliance, but your risk also depends on the AI provider. Use enterprise API endpoints when possible, and avoid sending sensitive PII unless you truly need it. Mask or redact data when you can.
Zapier steps can fail if they take longer than ~30 seconds. LLMAPI can help by routing requests away from slow providers and using fallback models, which improves the odds your Webhook responds in time.
Both. An image generation API typically returns an image URL. Zapier can pass that URL into actions like posting to social, saving to Drive, or attaching it to an email.
Power Apps already makes it easy to build internal tools fast. But at some point, a basic form or dashboard stops being enough. You want the app to do more. Summarize notes. Draft emails. Answer questions. Help people move faster.
That is where AI comes in.
If you use Microsoft Power Apps, you can connect your apps to outside APIs through connectors and custom connectors, which gives you a practical way to bring AI into your workflow. Power Apps is built for low-code business apps, and Microsoft’s connector system is what lets those apps talk to external services and APIs.
Microsoft also has native Copilot features in Power Apps, but external AI APIs give you more room to choose models, control the setup, and avoid tying everything to one path.
Below, let’s walk through how to connect AI APIs to a Power Apps setup step by step.
Power Apps already gives you a fast way to build internal apps. But when the AI part gets more serious, many teams want more than a basic built-in feature set. They want better model choice, more control over prompts, more predictable costs, and a setup they can swap later without rebuilding the app.
That is where external AI APIs start to make a lot of sense.
There is one honest downside, though: developers do complain that third-party API work in Power Apps can feel clunky at times. One Reddit thread flat-out says custom service integration can be the least fun part of the platform. So yes, external APIs give you more flexibility, but they also ask for a bit more setup discipline.
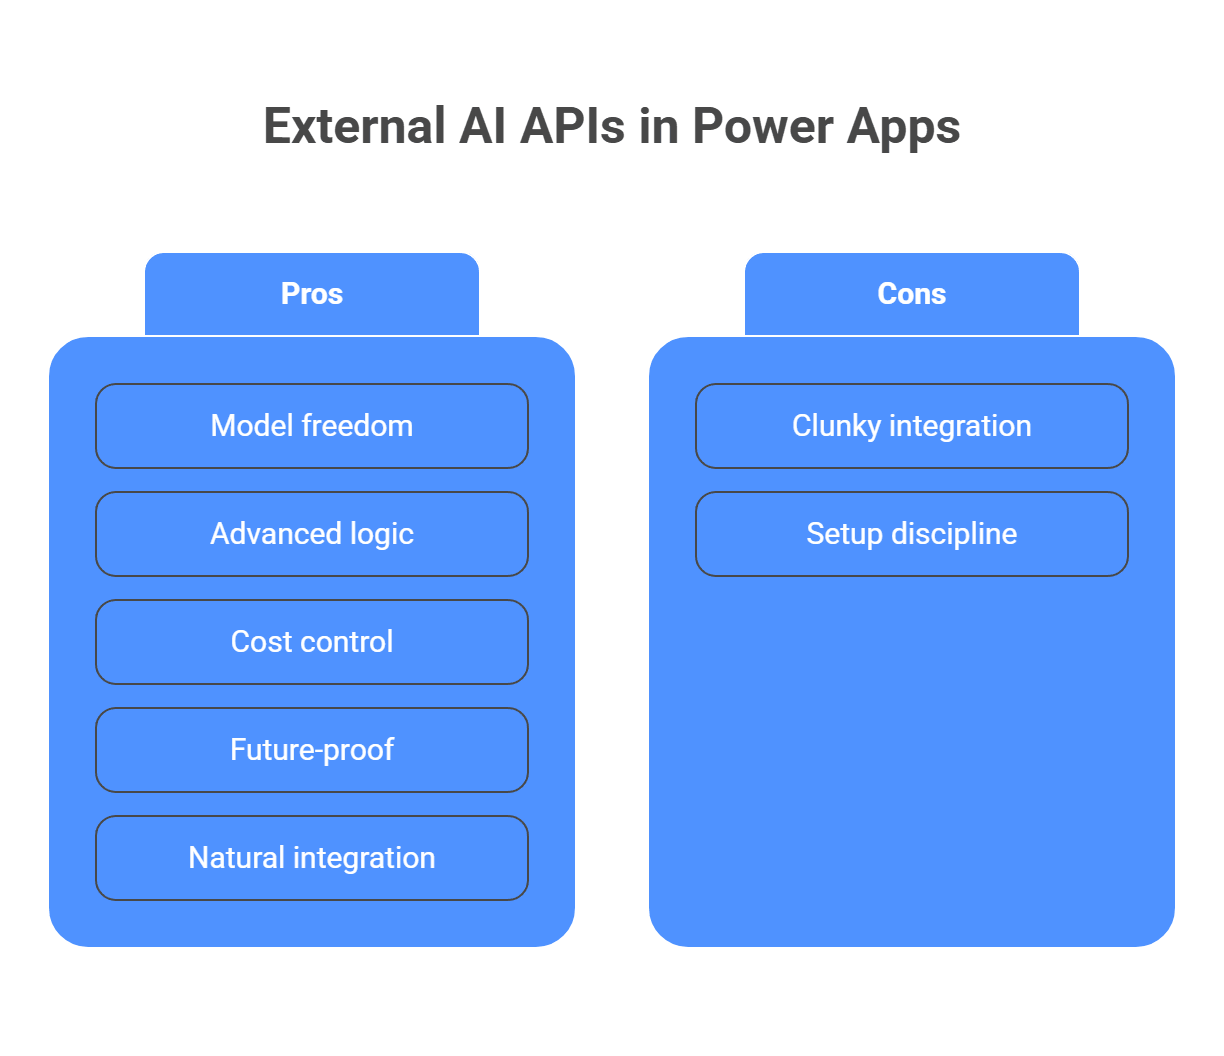
Before you build anything, it helps to know your options. There are really three common paths here, and each one fits a different kind of app. And yes, the right choice depends on one simple question: do you need a quick built-in feature, a background workflow, or a real-time AI experience inside the app?
This is the simplest route. Microsoft’s AI Builder already covers prebuilt tasks such as receipt processing, text recognition, and other ready-made AI components inside Power Apps. So if your need is fairly standard, this is usually the fastest path to a working result.
This route works best when you want:
This option makes sense when the AI task does not need to answer the user instantly on screen. Your app can trigger a flow, the flow can call an API, then save the result somewhere, send an email, or update a record.
This route works best when you want:
This is also a way where you can use something like LLMAPI if you want the flow to call one AI endpoint while still keeping access to different models behind the scenes. That way, if you later want to switch providers or compare outputs, you do not have to rebuild the full flow logic.
This is the most flexible option, and usually the most useful one for interactive AI features. A custom connector gives your app a direct bridge to an external API. In plain terms, that means your Canvas app can send data to an AI model and get the answer back right inside the interface.
This route works best when you want:
And this is also where LLMAPI fits especially well. Instead of wiring your custom connector to one model provider and locking the app into that choice, you can point it to a unified AI endpoint and keep more flexibility on the backend. So the Power App stays the same, while the model behind it can change later if needed.
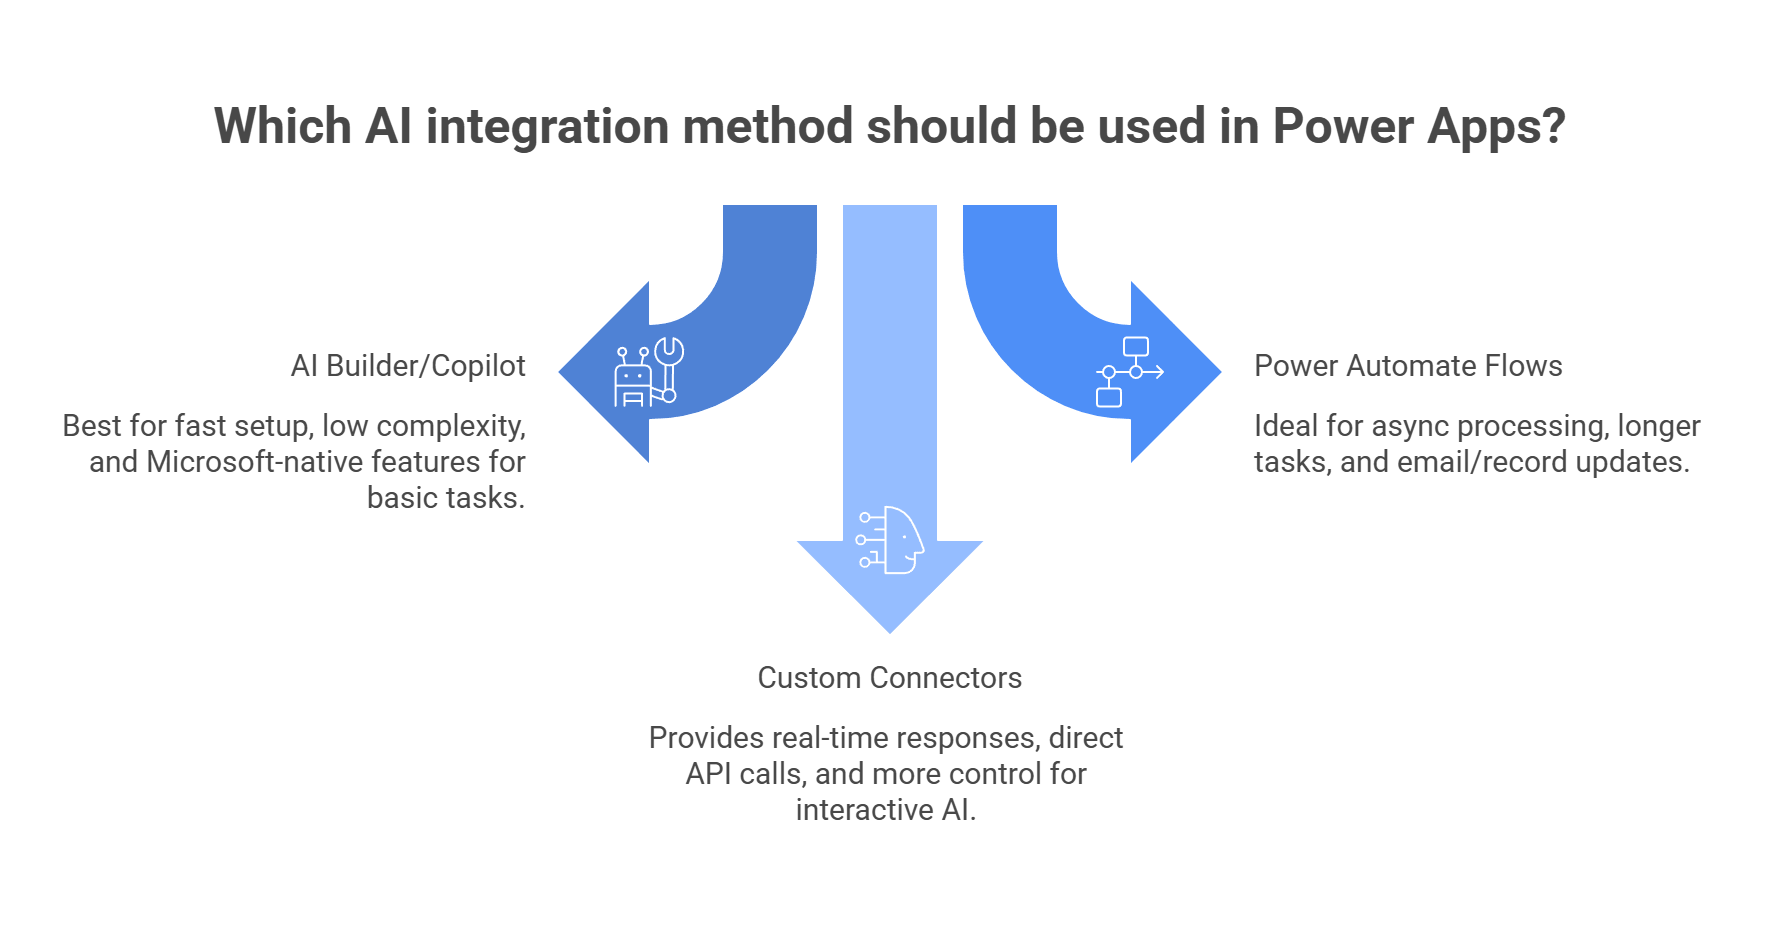
If you want something quick and standard, go with AI Builder. If the job can happen in the background, Power Automate is often enough. But if you want a real-time AI experience inside the app, something that reacts right away and feels like part of the interface, custom connectors are usually the strongest option.
This is the route to take if you want your app to send a prompt to an AI API and show the answer right in the interface. In plain terms, you are building a custom connector that acts like a bridge between your Power App and the AI endpoint. Microsoft defines a custom connector as a wrapper around a REST API that Power Apps can call.
Before anything else, you need an API key. If you want one fixed provider, you can use that provider directly. If you want more flexibility later, you can use a unified gateway such as llmapi.ai, so your Power App points to one endpoint while you keep the option to change models behind it later.
The practical reason for this is simple: once a connector is live in an app, you usually do not want to rebuild it every time you want a different model or provider.
Go to make.powerapps.com, then open Data and Custom connectors. Choose New custom connector and Create from blank. Microsoft’s current docs for blank custom connectors follow this same flow.
Give the connector a clear name, such as GlobalAIAssistant.
In the General tab:
That host-and-path split is how Microsoft’s custom connector setup is designed to work.
Move to the Security tab.
If your AI endpoint uses a bearer token in the header, select API Key authentication, then set:
Microsoft’s custom connector docs explicitly note that for APIs requiring bearer authentication, you add Bearer plus a space before the API key when you create the connection.
Now go to the Definition tab and create a new action.
Add:
That Operation ID matters because it becomes the function name you call from Power Apps later. Microsoft’s docs on using custom connectors in Power Apps follow this same connector-action pattern.
Under Request, choose Import from sample.
Then:
A simple sample body like this is fine:
{
 "model": "gpt-4o",
 "messages": [
   {
     "role": "user",
     "content": "Sample prompt"
   }
 ]
}
Microsoft’s blank-connector guide uses this same “import from sample” approach to build the request shape from a real example.
Save the connector, then move to the Test tab. Create a New connection and enter your authorization value. Again, if the API expects bearer auth, Microsoft says to include Bearer before the key. Then test the action with sample input.
If all is set up correctly, you should get a 200 OK response and see the model’s reply in the response body.
Now open your Canvas app in edit mode.
From the Data pane:
Then add a few basic controls:
This follows Microsoft’s documented flow for using a custom connector from a Power Apps app.
Now wire up the button.
Your OnSelect formula can call the connector action and store the result in a variable. The exact response shape depends on how the connector reads the schema, so your formula may need a small adjustment after testing.
A simple pattern looks like this:
UpdateContext(
   {
       varAIResponse:
           GlobalAIAssistant.GenerateText(
               {
                   body: {
                       model: "gpt-4o",
                       messages: Table(
                           {
                               role: "user",
                               content: txtPrompt.Text
                           }
                       )
                   }
               }
           )
   }
)
Then set the label text to the response field that contains the generated message.
You now have the core connection in place. From here, you can shape the prompt, format the response, and turn it into a real app feature.
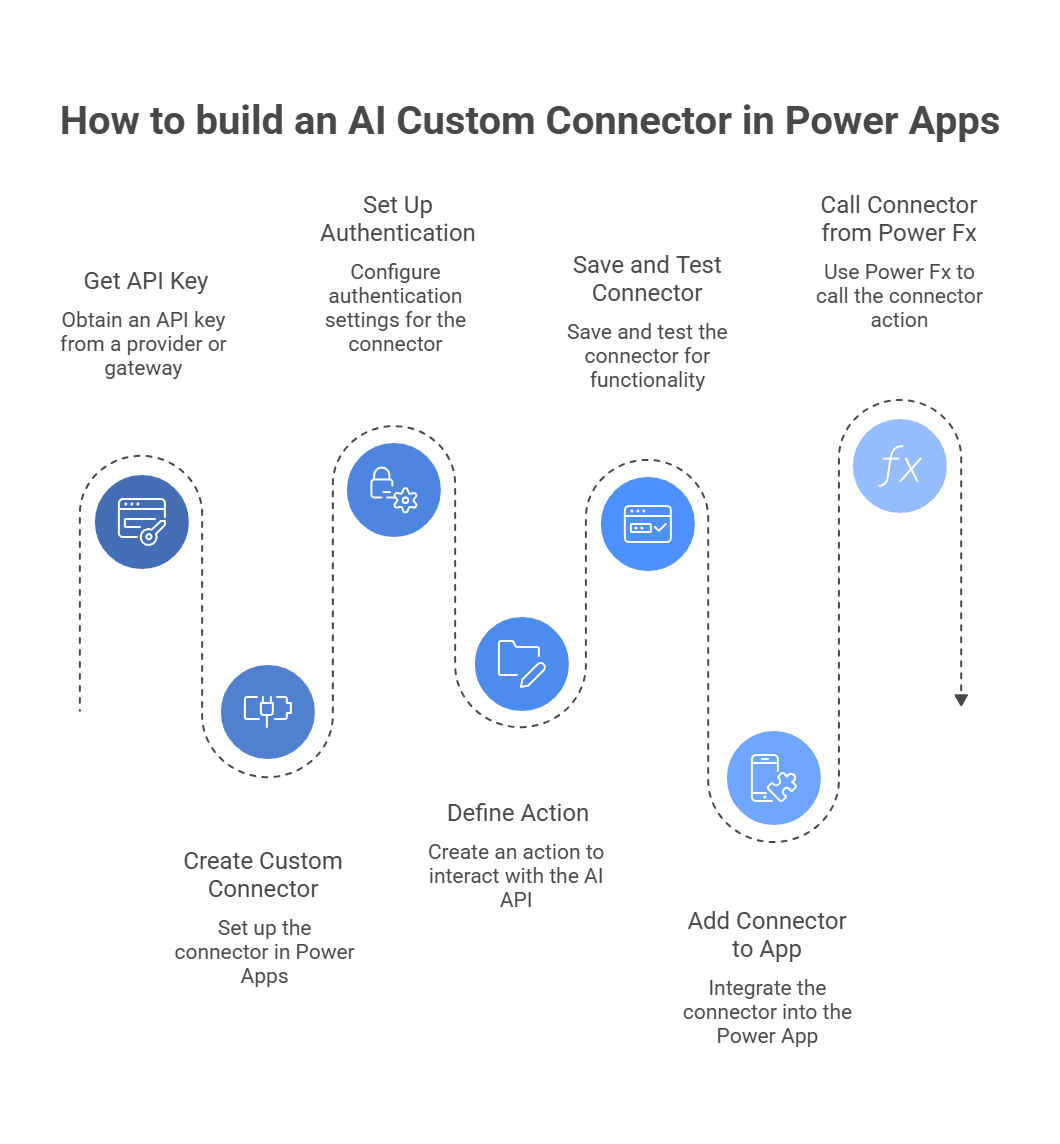
Once you connect external APIs to Power Apps, the same few problems show up again and again in community threads. Not because the idea is bad just because low-code platforms get awkward fast when the payloads are messy, the response takes too long, or the app starts making more calls than you expected. Reddit threads in r/PowerApps regularly point to nested JSON, timeout behavior, and scaling pain as the real friction points.
This is one of the biggest complaints. Power Apps can work with JSON, but once the response has deep arrays and nested objects, the formulas can turn into a headache. In one Reddit thread, users pointed out that custom connectors work much better when the response is already structured as typed data.
In another, a user had to use ParseJSON() to deal with the returned array from Power Automate. So if the response shape starts to feel painful, a very practical fix is to let Power Automate parse the heavy JSON first and return only the clean string or fields your app actually needs.
If you ask the model for something huge, the app may sit there waiting and then fail anyway. A recent Reddit post about gateway timeout issues in Power Apps described retries and waits still getting cut off around the 2-minute mark even after timeout-related settings were adjusted.
Another thread noted that Power Apps only hangs until it gets a quick accepted response, which is why long-running work is often better pushed into a flow. So if the task may take a while, such as long text generation or complex background processing, use Power Automate or another async path instead of making the app wait live on screen.
This one is simple, but people still run into it. If users can send blank text, half-finished prompts, or malformed values, you end up with bad API requests and confusing errors. The easiest fix is basic validation in the app before the connector ever runs: check for blank strings, set minimum input rules, and give the user a clear message before anything gets sent.
Community discussions around Power Apps integrations often frame this kind of lightweight guardrail as the difference between “it works in testing” and “real users break it in five minutes.”
One or two users testing an AI feature is one thing. A whole team pressing the same button all day is another. Power Apps community threads often shift from “How do I connect this API?” to “How do I control usage and licensing once this grows?” That is why it helps to track API usage early, limit unnecessary calls, and think about caching or routing lighter tasks to cheaper models where possible.
A good rule here is pretty simple: if the response is too nested, clean it before it reaches the app. If the request is too slow, move it to a flow. If the input is too unpredictable, validate it first. And if adoption starts to grow, watch usage before the bill surprises you.
Adding generative AI to Microsoft Power Apps can turn internal tools from simple data-entry forms into more useful assistants. With Custom Connectors, teams can go beyond native limitations and connect their apps to a wider range of language models, which makes it easier to build faster, more capable workflows.
The real challenge is reliability. If your app depends on one provider only, any outage, pricing shift, or model change can create problems fast. That kind of setup can make a business tool feel fragile, especially when teams depend on it every day.
That is why routing Power Apps requests through llmapi.ai can be a practical move. It gives you one OpenAI-compatible API, access to 200+ models, multi-provider support, cost-aware routing, and monitoring for errors, reliability, and usage. That means you can keep your connector setup more flexible without constantly reworking your app logic.
Why use LLMAPI?
If you want to build Power Apps workflows that are smart, fast, and easier to maintain, LLMAPI is a natural fit. It helps you keep the AI layer flexible underneath, so your team can focus more on the app experience and less on provider-related headaches.
AI Builder gives you pre-trained, low-code models inside Microsoft (great for things like invoice extraction). A Custom Connector lets you call external LLMs (OpenAI, Anthropic, Gemini) for more flexible tasks like chat, long-form text, and complex reasoning.
With LLMAPI’s unified endpoint, you usually keep the same connector and auth setup. In your app, you change the model value in the request (for example, from “gpt-4o” to “claude-3.5-sonnet”).
No. You need basic API understanding (JSON body + headers). Most setup is point-and-click, and you’ll use simple Power Fx logic to send requests and parse responses.
Canvas apps have tight time limits. For longer AI outputs, route the request through Power Automate: trigger a Flow, let it wait for the response, then send results back to the app (or email/notify the user).
If you hardcode one provider, the app can fail during outages. Using LLMAPI allows automatic failover so requests can route to a backup model when the primary one errors or times out.
Want to bring AI into the tools your team already uses every day? You do not need a full backend, a complex app, or an enterprise setup to do it.
If your work happens in Google Sheets, Docs, Gmail, or Forms, Google Apps Script gives you a simple way to connect those apps to modern AI APIs and automate useful tasks right inside Google Workspace.
Google Apps Script is Google’s cloud-based JavaScript platform for extending Workspace apps. In plain terms, it lets you add custom logic to Google tools and send API requests to outside services. So you can use AI to analyze data in Sheets, draft emails in Gmail, summarize form responses, or build reports in Docs, all without building a separate web app.
Below, let’s walk through how to connect Google Apps Script to AI step by step.
Why use Google Apps Script for this at all? Because it lets you add AI right where your team already works, without turning the project into a full-blown app build.
A few reasons it works so well:
One thing to keep in mind: Apps Script is great for lightweight to medium workflows, but Google’s own best-practices guide says performance improves when you minimize calls to external services and batch operations where possible. So it is powerful, but you still want to build it smart.
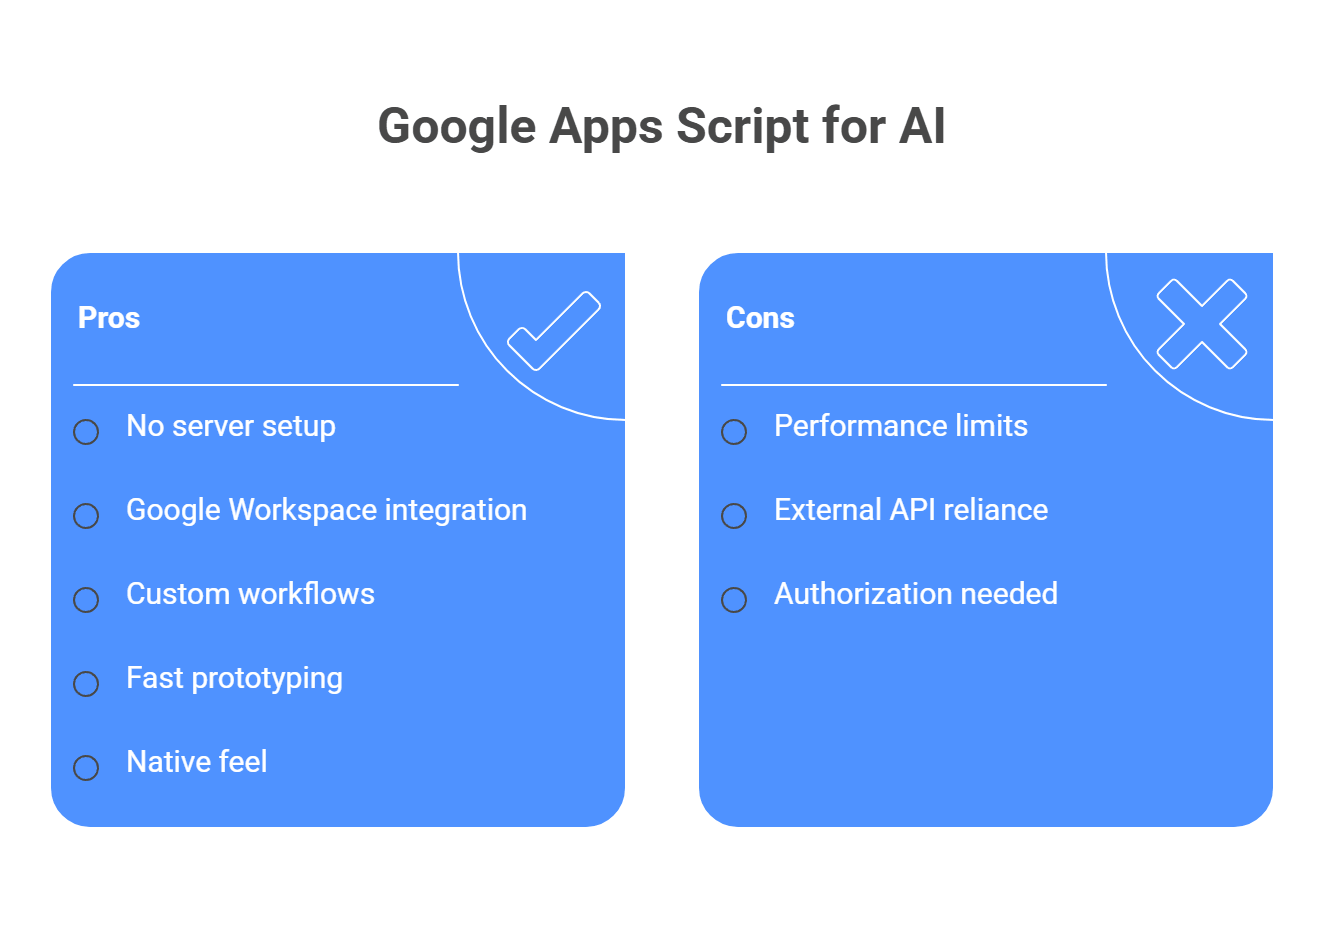
Before you write any code, make sure a few basics are in place. Nothing too dramatic, but it will save you a lot of “why is this not working?” later.
Here is the setup:
One small heads-up: Apps Script also has quotas and limits, so if you plan to run lots of AI requests, it is smart to keep that in mind from the start.
First, you need an API key so Apps Script can talk to an AI model. You can get one from a single provider, or use a unified gateway if you want the freedom to switch models later without rewriting your whole script. That matters more than it seems at first. Today you may test one model. A month later, you may want a cheaper one for bulk tasks or a stronger one for harder prompts.
Keep that key private. Apps Script can call outside APIs with UrlFetchApp, but the safer place for secrets is PropertiesService, not a hardcoded string inside your file. Google’s docs also show script properties as the standard way to store values like this inside the project.
Now open the Google app where you want the AI feature to live. For this guide, Google Sheets is the easiest place to start.
Open a new or existing sheet, click Extensions, then Apps Script. A new tab will open with the Apps Script editor and a default Code.gs file. Rename the project to something clear, such as AI Sheets Integration, so you do not end up with five mystery projects later. Google’s bound-script guide and Sheets custom-function docs both support this kind of setup.
This is where the real connection happens. Apps Script uses UrlFetchApp to send HTTP requests to outside APIs, so this is the service that lets your spreadsheet talk to an AI model. Google’s external API guide also points to UrlFetchApp as the standard way to work with third-party APIs, JSON payloads, and JSON responses.
Replace the default code in Code.gs with a function that:
/**
 * Custom function to ask an AI a question based on a prompt.
 * * @param {string} prompt The instruction or question for the AI.
 * @param {string} context Optional additional data to provide to the AI.
 * @return The generated text from the AI.
 * @customfunction
 */
function ASK_AI(prompt, context) {
  if (!prompt) return "Error: Please provide a prompt.";
  const apiKey = 'YOUR_API_KEY_HERE';
  const apiUrl = 'https://api.yourprovider.com/v1/chat/completions';
  const fullMessage = context ? `${prompt}\n\nContext: ${context}` : prompt;

  const payload = {
    model: "your-chosen-model", //e.g., "gpt-4o" or "gemini-1.5-pro"
    messages: [
      { role: "system", content: "You are a helpful data assistant." },
      { role: "user", content: fullMessage }
    ],
    temperature: 0.7
  };

  const options = {
    method: "post",
    contentType: "application/json",
    headers: {
      "Authorization": "Bearer " + apiKey
    },
    payload: JSON.stringify(payload),
    muteHttpExceptions: true //Helps with debugging errors instead of crashing
  };

  try {
    const response = UrlFetchApp.fetch(apiUrl, options);
    const json = JSON.parse(response.getContentText());
    if (json.choices && json.choices.length > 0) {
      return json.choices[0].message.content.trim();
    } else {
      return "Error: Unexpected API response structure.";
    }
  } catch (e) {
    return "Request failed: " + e.toString();
  }
}
For quick tests, a hardcoded key is okay. For anything shared or long-term, move it into Script Properties and read it with PropertiesService.getScriptProperties(). That keeps the key out of the code itself.
Before the script can make outside requests, you need to authorize it.
In the Apps Script editor:
Google’s authorization docs say that when a script needs new permissions, you usually have to run a function manually once in the editor to trigger the consent screen. The required external-request scope is also part of UrlFetchApp.
If something breaks, check the execution log and response body. That is usually where the useful clue lives.
One thing worth knowing before you go too far: custom functions in Google Sheets have limits. Google says a custom function must return within 30 seconds, or the cell throws an error. So this setup is great for light and medium AI tasks, but not ideal for very slow or heavy workflows.
Now comes the fun part. Go back to your sheet and use the function like a formula.
For example:
That lets the sheet send the row data to the model and return the result right into the cell. If it works, you can drag the formula down and process many rows at once.
That said, there is one catch: Google’s custom-function docs make it clear that custom functions have restricted behavior and are not always the best fit for more advanced workflows. They cannot edit other cells freely, and some authorization-heavy services do not work in custom functions. So for bigger jobs, it is often smarter to use a custom menu or button that runs a normal Apps Script function instead of relying on a sheet formula.
Google Apps Script is great for quick AI workflows, but it does have limits. And yes, developers complain about the same few issues over and over on Stack Overflow: scripts time out, custom functions choke on large sheets, and row-by-row API calls turn into a mess fast.
Here are the main pain points to watch for:
So how do you fix it?
The better approach is to stop treating each cell like its own tiny app. Instead:
That advice lines up with both Google’s best practices for Apps Script and the way experienced developers handle timeout problems in forum threads. Google recommends minimizing calls to external services and batching operations whenever possible.
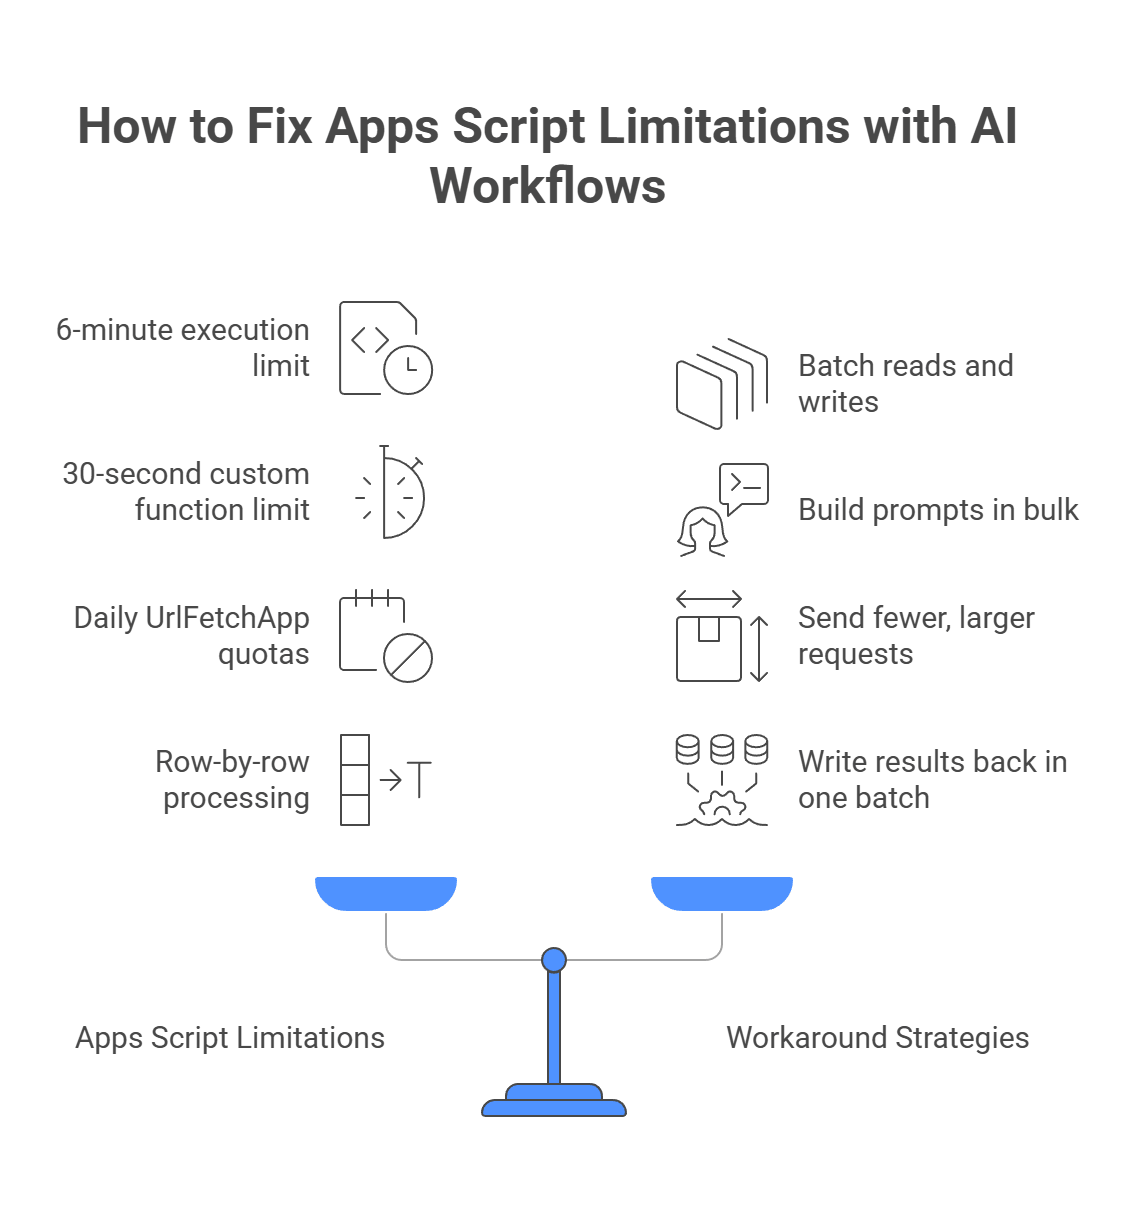
Using AI inside Google Apps Script is a high-leverage way to improve everyday workflows. It helps teams turn raw data into useful automation without leaving the tools they already use. That makes it a practical way to build lightweight, customized AI solutions right inside your existing workspace.
The harder part starts later. Rate limits, slow responses, and model changes can turn a simple script into something that needs constant attention. What starts as a quick automation can become another thing your team has to babysit.
That is why it helps to add a smoother layer between your script and the model providers. A tool like llmapi.ai can make your UrlFetchApp requests easier to manage by giving you one consistent API, more flexibility across models, and a simpler way to keep automations running without extra backend mess.
Why use the LLM API?
If you want your Apps Script automations to stay simple on your side while still being flexible underneath, LLM API is a natural next step. It helps you spend less time dealing with AI infrastructure and more time building workflows people actually use.
Yes. Apps Script is included with personal Google accounts and Google Workspace. It has daily quotas, but there’s no extra cost for using it. You still pay for whatever AI API you call.
Yes. Use GmailApp to read emails and create drafts, and UrlFetchApp to send the email text to an AI API (for summaries, reply drafts, tagging, etc.).
Apps Script has a strict ~60-second limit on external requests. Routing through LLMAPI lets you switch to a faster model when a slower one lags, which reduces timeouts.
Most of the time it’s a bad request format or an invalid API key. Set muteHttpExceptions: true in your UrlFetchApp options so Apps Script returns the real HTTP error (like 401 or 429) and you can debug it.
If your script already calls LLMAPI’s OpenAI-compatible endpoint, you usually only change the model value in the JSON payload (for example, from “gpt-4o” to “gemini-1.5-pro”). Your URL, headers, and auth flow stay the same.
You ship a feature, it starts getting real traffic, and suddenly your app is talking to three different models with three different quirks. The clean fix is simple: your app talks to one proxy, and that proxy talks to many LLM providers.
That setup keeps fewer secrets in code, protects data better, lowers cost, steadies latency, and makes provider swaps boring. The core flow stays the same every time:
client -> gateway -> provider -> gateway -> client.
Here’s what you’ll learn:
Using a gateway (quick trade-off)
Before you go deeper, this mini table makes the decision concrete:
| Topic | Direct to provider | Gateway proxy |
|---|---|---|
| Security | Secrets spread across services | Centralized auth and policy |
| Cost control | Hard to cap per team | Budgets, quotas, and routing rules |
| Reliability | One vendor outage hurts | Fallbacks and retries |
| Observability | Logs scattered | One trace per request |
For broader 2026 context on why “control layers” are showing up everywhere, see this roundup of 15 Best OpenRouter Alternatives for LLM Routing.
Picture a mail sorter. Every envelope looks different, but the sorter checks the stamp, reads the address, and sends it down the right chute. An llm proxy does the same job for Hypertext Transfer Protocol traffic, except your “envelope” is json.
First, your client hits a single api endpoint. It includes headers (auth, idempotency, tracing) and a payload (messages, tools, max_tokens).
Next, the gateway validates and routes the request to a specific llm provider. If you stream, the proxy starts sending chunks back as soon as the first token appears, rather than waiting for the full completion.
A simple sequence-diagram style chart you can keep in your head:
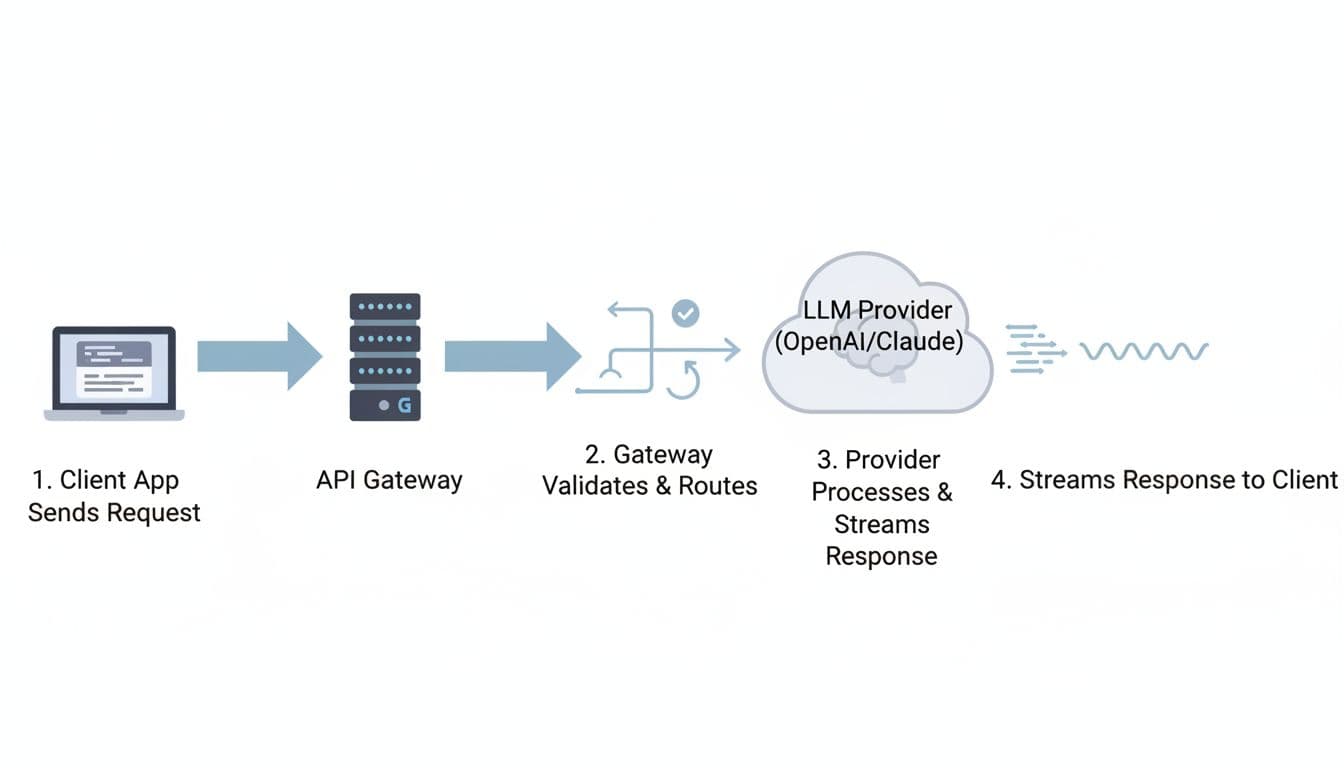
One practical table helps you map “hop by hop” behavior:
| Hop | Common gateway actions |
|---|---|
| Receive | Parse request, enforce max body size |
| Validate | Validate schema, reject bad parameter names |
| Route | Choose provider and model, apply rules |
| Forward | Sign request, set timeouts, send upstream |
| Stream back | Pass chunks, backpressure, handle disconnects |
| Finish | Record metric, redact, store minimal audit fields |
Proxying at this stage (trade-off)
Even the fanciest gateway usually boils down to six steps:
A tiny “OpenAI-style” request shape looks like this (in words): a POST to /v1/chat/completions with { "model": "gpt-4o", "messages": [...], "max_tokens": 256, "stream": true }.
When you stream, buffering becomes your enemy. If you wait to collect everything, your “time to first token” gets worse, and the UI feels stuck.
Minimum path (trade-off)
Most outages don’t look dramatic. They look like “slow first token,” then a client disconnect, then you retry and pay twice. Common failure modes include:
Different providers also disagree on naming and response shape. That’s why a gateway often normalizes requests and responses into one abstraction. The catch is that normalization can hide “special” features that only one vendor supports.
Gotcha: don’t retry a half-finished stream the same way you retry a normal response. You can’t safely “replay” what the user already saw.
Normalization (trade-off)
LLM Requests behave less like classic REST and more like long-lived sessions with metering. Tokens make cost visible, streaming makes latency visible, and agentic ai makes traffic spiky because one user action can trigger five tool calls.
Real-world numbers help frame this:
For performance context, this 2026 write-up summarizes those throughput and overhead claims in one place: Top 5 ai gateways for 2026.
A latency budget pie (sample) looks like this:

Scale concepts (trade-off)
A token is a small chunk of text. You pay for input tokens you send and output tokens you receive. Because of that, you need token usage accounting by api keys, team, tier, and feature. Otherwise, your bill turns into folklore.
A practical “what to log per request” table (keep it sparse, and hash sensitive fields):
| Field | Why you care |
|---|---|
| Request id | Join traces across services |
| User or team | Chargeback and abuse detection |
| Model | Explain behavior changes |
| Tokens in/out | Cost estimate and quotas |
| Latency (p50/p95) | SLO tracking |
| Cache hit | Show savings, find repeats |
| Errors | Spot provider incidents |
If you store prompts, privacy becomes a real risk. Many teams store hashes plus a 1% sample with consent, then delete raw text quickly.
Accounting (trade-off)
For a quick description of how a popular python proxy frames routing and accounting, this overview is a helpful reference: LiteLLM gateway summary.
Streaming means you forward chunks as they arrive. It feels fast because the user sees words immediately. However, it complicates retries. If the stream drops at 80%, a blind retry can double cost and confuse the UI.
Multimodal payloads (text plus image) also change the rules. The input gets larger, validation gets stricter, and payload limits appear sooner. Buffering can increase latency, yet pure pass-through streaming makes debugging harder because you must inspect data without blocking.
Streaming and multimodal (trade-off)
As a CTO or developer, you don’t want “magic.” You want a checklist you can test.
A production proxy is usually responsible for:
One table keeps you honest about success criteria:
| Responsibility | How you measure it |
|---|---|
| Security | Key rotation time, policy violations |
| Reliability | Error rate, fallback rate |
| Performance | p95 latency, time to first token |
| Cost | Cost per 1K tokens, budget overages |
| Quality | User ratings, eval pass rate |
Production responsibilities (trade-off)
Centralizing secrets is boring, which is why it works. Put api keys in one place, rotate them, and scope them by environment and team. Then add redaction rules for PII before any request leaves your network.
Example: you run a support chatbot that must block SSNs. The gateway can detect a 9-digit pattern, redact it, and return a safe error. You can also allowlist tool domains, so an agent can only fetch from approved internal systems, not random sites.
Security (trade-off)
Routing rules should read like product intent, not a science fair. Send “summarize” to a fast, cheaper model. Send “legal draft” to a stronger model. If your primary provider returns a 429, fail over to another route.
Keep rollouts safe with A/B routing and canary releases. Start with 5%, watch error rate and latency, then increase. This is also where you set max_tokens defaults, because uncontrolled verbosity is a silent cost leak.
Routing (trade-off)
If you want to simplify multi-provider LLM Requests without building your own proxy, LLMAPI.ai fits the “one front door” pattern. You point your app at a single llm api, keep an OpenAI-compatible request format, and switch a specific llm by changing the model string.
In practice, that helps when you’re making api requests from multiple services and don’t want each one to embed vendor logic. It can also be a path to a free llm api trial for integration tests, before you commit budgets and governance rules.
LLMAPI.ai (trade-off)
You don’t need a perfect system. You need predictable behavior under load.
Start with these guardrails:
Here’s a simple “before vs after” chart (sample targets) you can aim for:
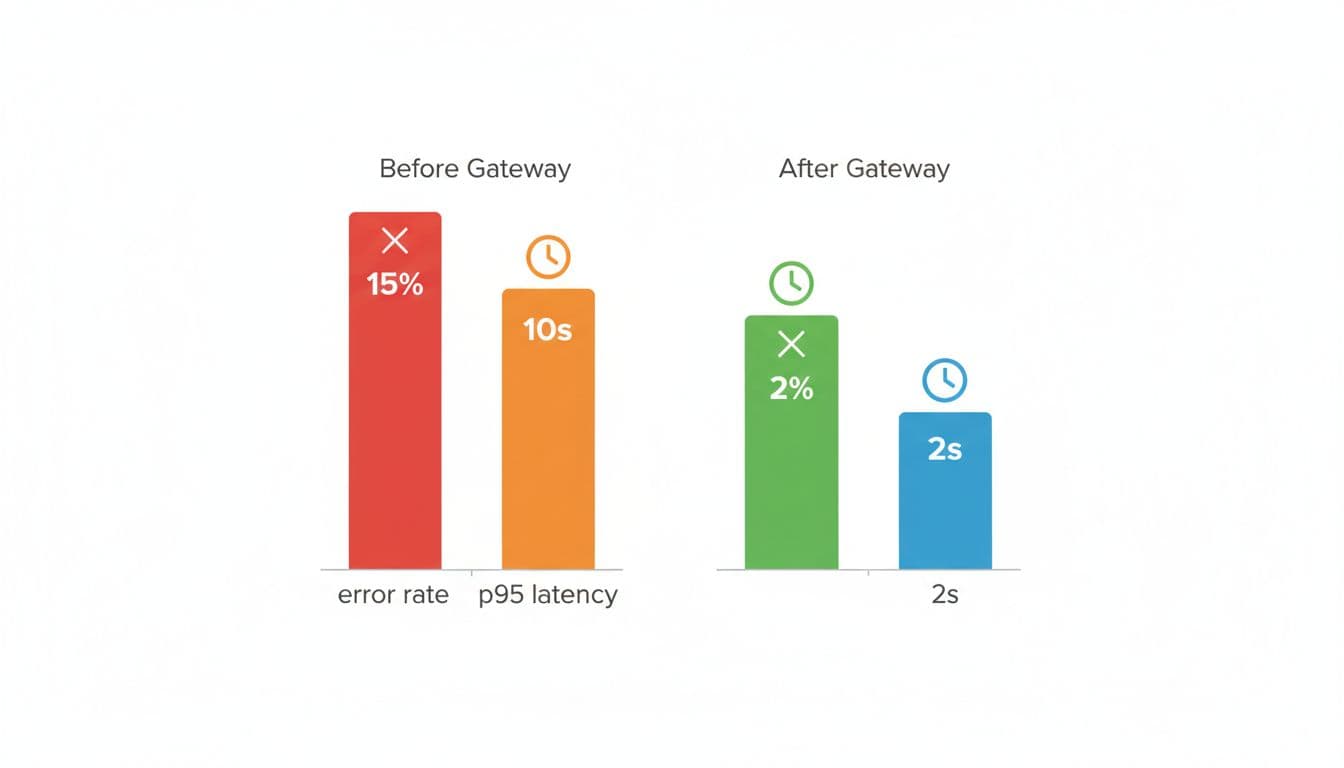
If you’re chasing very high throughput (think 5,000 RPS), language choice matters. Python is fine for moderate traffic, but extremely high RPS paths often move to faster stacks or a thinner data plane so the proxy overhead stays tiny.
For another 2026 overview of routing patterns and gateways, see this guide to LLM routing and gateways.
Best practices (trade-off)
Idempotency means “same request, same side effects.” It matters when your client times out but the provider finished anyway. Without it, you can double-charge and double-act.
Caching helps when prompts repeat (same query, same context, same model settings). It doesn’t help when the answer should change, or when personal data must not persist.
A safe cache key usually includes prompt + model + settings, plus a TTL.
This retry policy table keeps things simple:
| Error type | Retry? | Notes |
|---|---|---|
| 429 | Yes | Backoff + jitter, respect headers |
| 500 | Yes | Small capped retries, then fallback |
| Timeout | Maybe | Prefer fallback, avoid blind replays |
| Validation error | No | Fix client payload |
Repeatability (trade-off)
If you can’t see it, you can’t fix it. Track p50 and p95 latency, time to first token, tokens in/out, cost per request, provider error rates, and fallback rate. Add user-rated quality when you can, because silent regressions hurt the most.
A lightweight approach works well: store hashes for most traffic, and sample 1% of prompts for deeper debug with consent. That gives you a path to optimization without building a surveillance machine.
Also, keep one “golden set” of eval prompts in GitHub. Run it on every routing change, and you’ll catch drift before users do.
Measurement (trade-off)
You run a support chatbot with rag. Users ask questions, you pull relevant docs from a vector DB, and you generate an answer. The problem is uptime and cost. If OpenAI is slow, your queue grows. If claude rate-limits you, your UI stalls. If gemini has a bad day, your CSAT drops.
Your real-world architecture can stay simple:
A routing plan table (example) might look like this:
| Task type | Model tier (example) | Traffic split |
|---|---|---|
| Summarize tickets | Cheap, fast model | 70% |
| Hard troubleshooting | Strong model | 25% |
| Fallback mode | Local llm | 5% |
A chart idea you can show to finance: “Daily token spend by team” (bar chart).
From a developer standpoint, you keep it boring. In python you fetch your RAG context, then send requests once, not five times. In java you do the same, but with stricter timeouts and pooled connections. You decode streaming chunks into UI tokens, and you stop early when the user cancels.
Real-world setup (trade-off)
When you proxy LLM Requests through a gateway, you trade a little complexity for a lot of control. You get one stable surface while providers, models, and prices keep changing behind the scenes. If you want fewer incidents and fewer surprise bills, that trade usually pays for itself.
Use this final checklist this week:
This article breaks down the top LLM API use cases you can ship today, and, just as importantly, when you should (and shouldn’t) use an LLM. Instead of generic “AI can do anything” takes, you’ll get a practical map of what LLMs actually power in real products: support automation, smarter search over internal docs, document extraction, coding helpers, sales enablement, workflow agents with tool access, and more, plus the trade-offs around accuracy, latency, context limits, and cost.
It’s most useful for product teams, founders, engineers, and operators who need to pick the right AI feature and deploy it without wasting weeks on the wrong approach.
You’ll learn how to match each use case to the right pattern (chat vs embeddings vs tools), set expectations for quality, and keep things reliable and predictable in production, especially when traffic grows and token bills become real. If you use an LLM API gateway, it also helps with routing, observability, and spend controls so you can scale across providers without rewriting your integration.
TL;DR
An LLM (large language model) is software trained on large datasets to predict the next token in human language. In other words, it’s a text engine that can write, summarize, classify, and reason. Modern llms can generate text, follow instructions, and, with tool use, trigger workflows.
When you call a language api, the loop is simple:
Context windows keep growing in March 2026, which changes what’s possible with ai technologies. Some leading models can read massive inputs, including big codebases and long contracts.
That’s why agentic ai and repo-level ai coding feel more realistic now, especially with models like Gemini from Google AI and other popular llms.
Here’s a quick map of common patterns:
| Pattern | What you send | What you get back | Best for |
|---|---|---|---|
| Chat | role-based messages + context | conversational output | ai assistant, support, copilots |
| Completion | a single instruction | plain text | templated copy, short transforms |
| Embeddings | text chunks | vectors (numbers) | semantic search, clustering |
| Tool use | tool schema + messages | tool call arguments + answer | ai agent workflows, safe automation |
If you want the deeper request-to-response lifecycle (tokens, retries, production rollout), read How LLM APIs work: requests, tokens, and costs.
A fast checklist for choosing an api vs an open source llm:
You control more than you think.
These knobs decide quality, safety, and cost:
Bad prompt vs better prompt (plain text inputs):
Bad prompt: “Write a refund reply.”
Better prompt: “Draft a refund reply in a calm tone. Ask for order_id if missing. If order status is delivered, offer return steps. Output JSON with fields: subject, body, needs_human_review.”
That small change turns “nice text” into reliable llm outputs you can ship.
Most teams use llms in four buckets: product UX, engineering velocity, operations, and revenue. You can combine llms for bigger workflows, but start with one sharp use case.
This table helps you match model traits to the job:
| Use case | Best-fit model traits |
|---|---|
| Ticket triage + reply drafts | fast, cheap, strong instruction-following |
| Repo-wide code review | long-context, strong coding |
| Contract clause extraction | high accuracy, structured JSON |
| Knowledge base search | embeddings + solid chat synthesis |
| Product copy variants | fast, style control, low hallucination |
| Multimodal QA (image + text) | multimodal, tool calling |
If you want a broader list of applications of llms, this roundup is useful: LLM use cases and applications in 2026.

This is the most common specific use case because it touches ops and revenue. You can use ai to detect intent, draft replies, do order lookups, and escalate edge cases.
A realistic flow example:
get_order_status(order_id).Pros
Cons
To reduce hallucinations, use llms to provide answers only after RAG finds sources, or require strict tool calls for factual claims (order status, billing, account actions).
Content creation works when you feed the model real constraints, not vibes. Product descriptions, release notes, onboarding emails, knowledge base articles, and ad variants all fit. This is generative ai that pays off fast, especially for e-commerce and SaaS.
Inputs that make output better:
Example: generating 500 unique product descriptions for a catalog refresh. You can keep structure consistent while varying phrasing, so llms generate text that doesn’t look duplicated.
Still, add review for compliance. In regulated areas, your ai solution should flag risky claims and require approval.

AI coding is where long-context llms shine. With enough context, you can point a large language model at a failing CI log and get a focused plan: likely root cause, touched files, and unit tests to add.
Teams use this for refactors, docstrings, migration scripts, and bug triage.
Best practices that save you later:

This is where natural language processing becomes product glue. Legal teams can extract clauses (termination, indemnity, governing law). Finance ops can pull invoice fields (vendor, total, due date) into JSON. Internal IT can classify incident reports and summarize meeting notes.
Embeddings deserve one simple sentence: they turn text into vectors so you can search by meaning, not keywords, which improves natural language search over messy docs.
Here’s a compact output guide:
| Task | Right output format |
|---|---|
| Summarize | bullets with 5 to 10 points |
| Extract | JSON fields (typed, validated) |
| Classify | labels + confidence score |
You’re not “adding ai,” you’re adding a probabilistic dependency. That means you must plan for cost, latency, rate limits, privacy, security, and evaluation. Today’s llms are powerful, but they still make decisions in ways that surprise you.
“Treat prompts and logs like sensitive data,” a security lead said, “because the fastest breach is the one you accidentally stored.”
Pre-launch checklist:
Fine-tuning vs RAG vs prompt-only (quick trade-offs):
Tokens are your meter. Longer prompts and bigger context windows cost more, and they slow responses. Streaming helps perceived speed because users see the first token fast, even if the full answer takes longer. MoE and adaptive reasoning can help, but you still need budgets.
Cost control ideas that work:
| Knob | Impact on cost | Impact on latency | Impact on quality |
|---|---|---|---|
| Context size | high | medium | medium to high |
| Model size | high | high | high |
| Retries | medium to high | high | low to medium |
Start with redaction, encryption, and strict logging policies. Then add guardrails that force the model to prove its work: cite sources from RAG, require tool-based answers for facts, validate JSON, and add human review for high-risk flows (healthcare, legal, finance).
Red flags for “don’t use llm output directly”:
Once you ship a few ai applications, the hard part becomes switching models, tracking spend, rotating keys, and keeping one consistent integration.
That’s where LLM API fits as a practical hub: one connection, many models, plus usage analytics, cost management, role-based access, monitoring, and automated billing. It’s also a clean way to reduce vendor lock-in while you explore the top providers and proprietary llms.
A simple “how you’d use it” flow:
Routing keeps quality high without paying premium rates for every request:
Signals you can use to route:
This is advanced ai in practice: not one magic model, but a system that adapts.
You don’t need to train a large language model to get value from llms. You need one clear use case, solid tool use, and a plan for cost and safety. Once you ship, you can expand to more applications using llms across product, engineering, ops, and revenue.
Key takeaways:
A 3-step action plan for this week:
In plain terms, LLM APIs are application programming interfaces that let your app send text to a model and get text back.
In this article, you’ll learn How LLM APIs Work in practice, from building a request (messages, parameters, and tool schemas) to receiving a response (output text, token usage, and finish reasons) and shipping it safely in production.
You can call a provider directly, or you can put a gateway like LLM API in front to manage routing, usage, and consistent API access across many LLM models.
We’ll ground the guide in real use cases teams deploy in 2026, including customer support auto-drafts with human-review flags, RAG-powered knowledge base search over internal docs, sentiment and intent classification for ticket routing, and tool-calling workflows that let a model securely fetch order status or billing details from your backend before replying.
By the end, you’ll know how to manage tokens and pricing, reduce latency with streaming and caching, and roll out reliably with logging, retries, guardrails, and model fallbacks.
Think of an LLM API call like ordering at a drive-through. Your app places an order (request JSON), the kitchen prepares it (token generation on GPUs), and you get a receipt (response JSON plus usage).

Here’s the typical lifecycle:
A real-life example: customer support auto-replies. You ingest a ticket, classify intent, draft a reply, and add a “needs human review” flag when risk is high. Key metrics such as response time, time to first token (TTFT), token throughput, and error rate tell you if it feels instant or frustrating.
To understand why gateways matter in production, read LLM gateways explained.
Use this table to decide what to log before you need it:
| Step | What can go wrong | What to log |
|---|---|---|
| Request build | Wrong JSON shape, prompt too long | request_id, payload size, model, endpoint |
| Network | TLS errors, timeout | latency, timeout value, region |
| Provider edge | 401, 403, 429 | status code, rate-limit headers |
| Generation | slow TTFT, truncation | TTFT, total latency, finish_reason |
| App parse | JSON parse errors | response schema version, raw error |
| Reliability | retry storms | retry_count, backoff, circuit state |
Most LLM APIs accept either a single instruction (one prompt) or a chat-style list of messages. Chat messages help because role structure (system, developer, user) reduces ambiguity in natural language. Structure matters for natural language understanding because the model uses the sequence as its working context.
Common settings map to simple behavior:
Tool calling changes your API interactions. The model returns a tool request (function name plus arguments), your app runs it (database lookup, billing check, ticket status), then you send the tool result back so the model can finish. This is a component of LLM APIs that turns “chat” into workflows.
Good request habits (small, but they compound):
For a deeper “what happens under the hood” view, see what happens when you call an LLM API.
A typical response includes generated text (or structured output), a finish reason (stop, length, tool_call), and usage fields (input token, output token, total). Those usage numbers are your bill and your performance story.
Under the hood, most LLMs are autoregressive models. They generate the next token one step at a time, based on the prior context. That means streaming can show value early (low TTFT), even if the full completion takes longer.
For audits, store a minimal record. For example, keep: request_id, model, endpoint, timestamps, status code, token counts, and a redacted transcript. You can redact emails, phone numbers, and account IDs before writing logs. Keep the raw data out of analytics by default.
Action items for reliability:
LLM APIs play well with software systems you already run, but you still need API security and monitoring. The basics below show up in every serious LLM API integration.
This comparison helps you choose the right response mode:
| Choice | Best when | Risk |
|---|---|---|
| Streaming | user-facing chat, voice, live agents | harder logging and replay |
| Non-streaming | back-office jobs, exports, strict JSON | slower perceived response |
If you want a practical integration walkthrough from first call to production, this guide on using LLM APIs adds helpful context.
Providers expose different endpoint types, and the model api choice changes behavior and price even if the endpoint stays the same. That’s why “top LLM” talk is often misleading. You should pick a model based on the specific use cases you’re shipping.
Three common use case maps:
To see a catalog of options when you use an LLM through a gateway, browse available models in one place.
Here’s a simple planning table:
| Use case | Endpoint | Typical context size needs | Latency sensitivity | Risk level |
|---|---|---|---|---|
| RAG over docs | embeddings + chat | 8k to 200k | medium | medium |
| Code helper | chat + tools | 16k to 128k | high | high |
| Sentiment analysis | chat (short) | 1k to 8k | low | low |

Treat API keys like production passwords. Store them in environment variables, never in the browser, and don’t ship keys in mobile apps. Rotate keys on a schedule, and scope them by project, team, and environment. Least privilege matters because one leaked key can become a billing incident.
Data privacy checklist (quick, but real):
Prompt injection is the other “silent” risk. Attackers try to override system instructions or force tool misuse. Reduce exposure by validating inputs, using allowlists for tools, and separating system instructions from user content. This is where systems and large language models can fail in ways classic APIs rarely do.
Token-based pricing is still the norm in 2026. A token is a chunk of text, often 3 to 4 characters in English, but it varies. Output often costs more than input because generation consumes more compute.
Real-world price signals (examples, not guarantees): ultra-budget hosted open source options can land near $0.000000014 per input token (about $0.014 per 1M tokens), while premium models can reach $0.02 to $0.05 per 1K tokens for output on some tiers. OpenAI, Anthropic, and other LLM API providers publish different pricing structures, so you should confirm before you commit.
This pricing model table gives you a usable mental map:
| Model tier | Best for | Sample input price | Sample output price | Notes |
|---|---|---|---|---|
| Budget | tagging, summaries | $0.01 to $0.30 per 1M | $0.02 to $0.60 per 1M | great for high volume |
| Balanced | support drafts, RAG | $0.25 to $2.00 per 1M | $2.00 to $8.00 per 1M | good default |
| Premium | complex reasoning | $1.25 to $15.00 per 1M | $10.00 to $75.00 per 1M | use sparingly |
Free tier and free LLM APIs can help with quick testing, but production needs caps, alerts, and fallbacks.
For operations context, this LLMOps guide explains why monitoring and release discipline matter once usage scales.
Action items to keep API pricing predictable:
Set max_tokens, cache repeated prompts, summarize chat history, route requests by difficulty, and monitor daily spend.
You can estimate per-request cost with three numbers: input tokens, output tokens, and per-token price.
Example 1 (budget lane): 500 input tokens and 700 output tokens. Assume $0.014 per 1M input tokens and $0.028 per 1M output tokens. Input cost: 500 / 1,000,000 × $0.014 = $0.000007. Output cost: 700 / 1,000,000 × $0.028 = $0.0000196. Total: about $0.000027 per request. At 10,000 requests/day, that is about $0.27/day.
Example 2 (premium lane): same 500 in and 700 out. Assume $1.25 per 1M input and $10.00 per 1M output (a GPT-5-like shape). Input: 500 / 1,000,000 × $1.25 = $0.000625. Output: 700 / 1,000,000 × $10.00 = $0.007. Total: about $0.007625 per request. At 10,000 requests/day, that is about $76.25/day.
Usage patterns that blow up costs:
You don’t need one perfect model for every task. You need a good default plus routing. Most teams save money by tightening prompts and moving easy work to cheaper models, while keeping a premium fallback.
This table shows the trade-offs:
| Tactic | Saves money | Reduces latency | Tradeoff |
|---|---|---|---|
| Caching | yes | yes (often 20 to 40% in optimized setups) | stale answers risk |
| Batching | yes | sometimes | not for interactive UX |
| Streaming | no (usually) | yes (better TTFT) | harder parsing |
| Shorter prompts | yes | yes | quality can drop |
| Structured outputs | yes | sometimes | stricter schemas |
| Routing | yes | yes | more complexity |

You can integrate LLM APIs two ways: direct to a provider, or via an api provider layer (gateway) that normalizes calls. Direct is simple early. Gateways shine once you need multi-provider routing, clean logs, team keys, and spend controls.
CTOs care about uptime, compliance, and vendor risk. Developers care about fewer surprises at 2 a.m. This is why LLM APIs are transforming product roadmaps, but also why integrating LLM APIs without guardrails can break budgets fast.
If you want one API layer for routing, observability, and consistent API access, you can use LLM API as your API layer. It helps you swap models, apply budgets, and standardize API usage without rewriting every client.
For a broader view of production gateways, read choosing an AI gateway for production.
In production, reliability work is part of the feature, not a nice add-on.

Key metrics to watch: response quality score, refusal rate, hallucination rate, and cost per successful task.
LLM APIs work the same way every time: you authenticate, send an API request to an endpoint, the language model generates tokens, you parse the response, then you log, monitor, and iterate.

Pick one use case, run a small test, add guardrails, then choose your LLM API approach. The fastest teams keep it simple, measure everything, and ship in tight loops.